Build, Configure, and Secure Your Cloud Server from Scratch and Host a Simple Website
1. What You Need Before Starting
This section is a little special because it involves spending money. I want to stay neutral here, so I will not recommend specific vendors. What I can do is explain what you need to prepare.
1.1 Get a cloud server
You need a healthy cloud server whose IP is reachable from your location, and you should note down the following information from the provider’s control panel:
- Install the latest stable version of Debian on the server. This article uses Debian 10 as the example.
- Write down the server IP address. This article uses
"100.200.300.400"as a placeholder.That is an intentionally invalid IP address. Replace it with your real one.
- Write down the SSH port for remote login.
- Write down the SSH username and password.
Buying a cloud server can be surprisingly complicated. It is worth learning a bit about providers, lines, regions, and pricing before you buy. Choose something that matches your budget and your real needs. If you want, you can also look at free or trial offerings from large cloud vendors such as Oracle or Google. Just stay within your means.
A quick note on Debian 10: no matter what arguments you have seen online about which Linux distribution is “better,” that debate is not important for you right now. Debian 10 is already more than enough to give your server a stable and secure foundation, with practical advantages such as a cloud-friendly kernel and timely BBR support. Once you are comfortable with Linux, you can always explore other distributions later.
1.2 Get a domain name you like
You also need a domain name and an A record in DNS that points to your server’s IP address.
- Choose a trustworthy domain registrar or DNS provider.
- In the DNS settings, add an A record pointing to your cloud server’s IP. The subdomain label can be anything. This article uses
"www"as the example, so the full domain becomes something likewww.example.com.
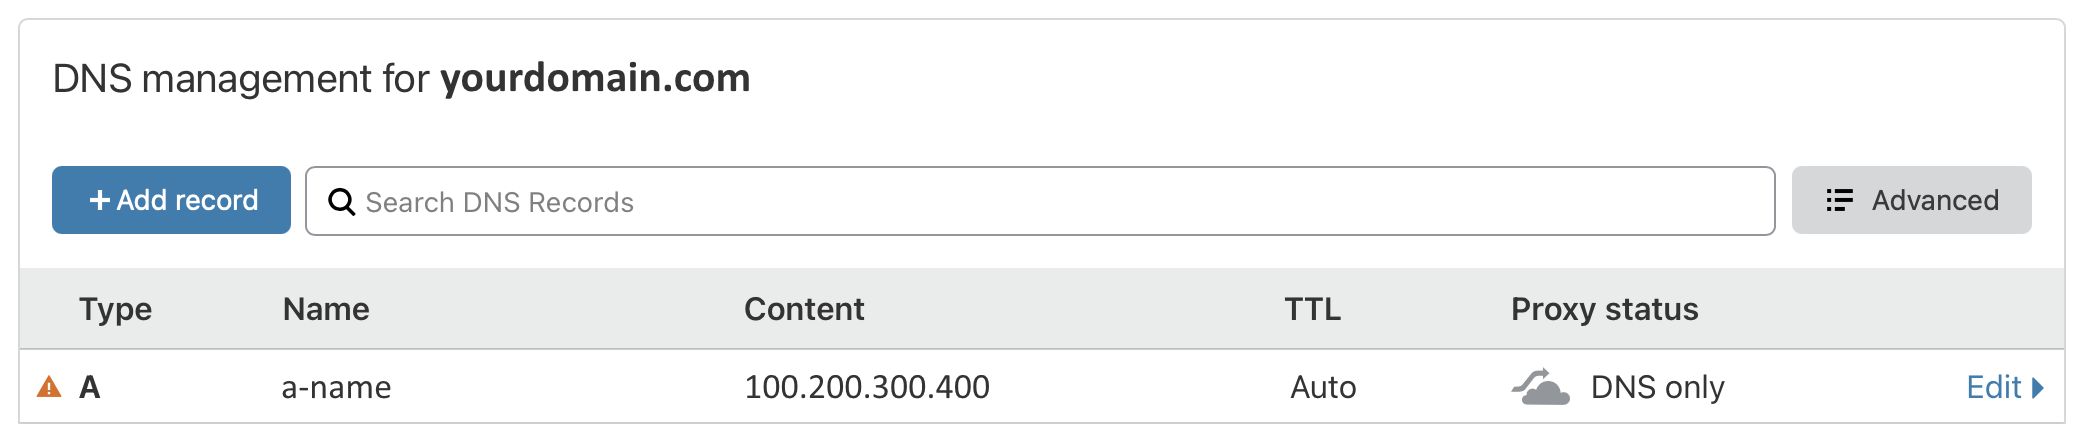
This is not a real, usable domain name. Replace it with your own.
1.3 Software you need on your local computer
-
An SSH client
- Windows: PuTTY
- macOS/Linux: Terminal
-
A remote file-transfer tool
- Windows: WinSCP
- macOS/Linux: Terminal
-
A reliable text editor
- Windows/macOS/Linux: VS Code
2. Remote Login
2.1 Log in to the server with PuTTY
Because a lot of beginners use Windows, this article demonstrates the process with Windows and PuTTY.
Yes, modern Windows also has PowerShell and WSL, both of which can give you a good SSH experience. But not every machine has the latest components, so for the sake of consistency this article uses PuTTY. If you use another SSH client, the steps after login are essentially the same.
Follow these steps:
-
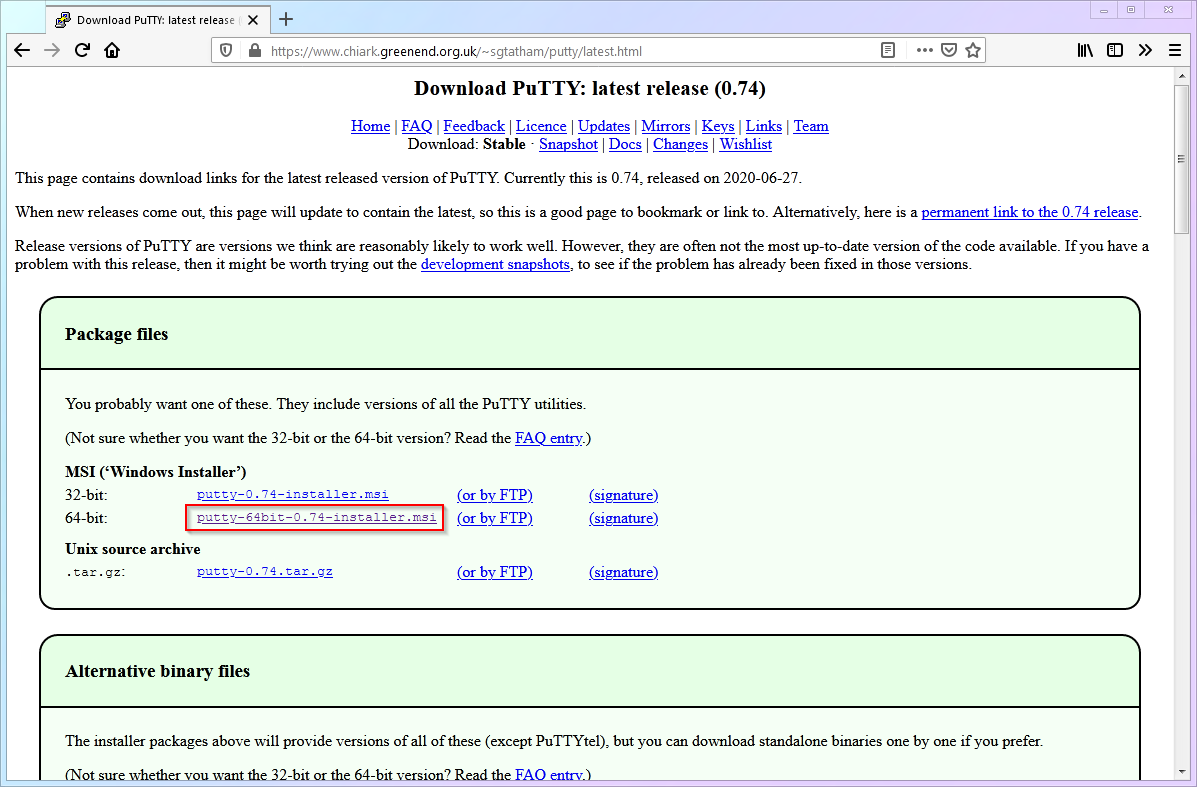
Visit the PuTTY website and download the version that matches your system. This article uses the 64-bit build.
-
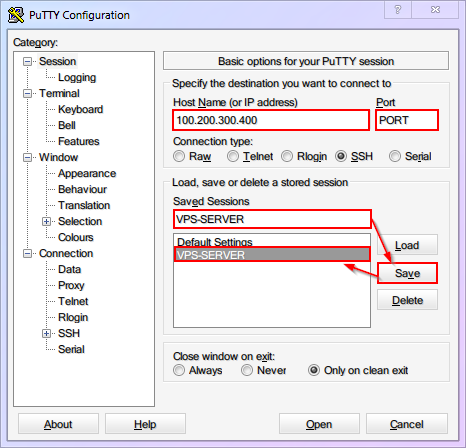
Open PuTTY and fill in the IP address and port of your server. To avoid entering them every time, save the session so you can load it later with one click.
-
I strongly recommend setting
Connection -> Seconds between keepalivesto60so the SSH session is less likely to disconnect when idle. Save the session again after you change anything.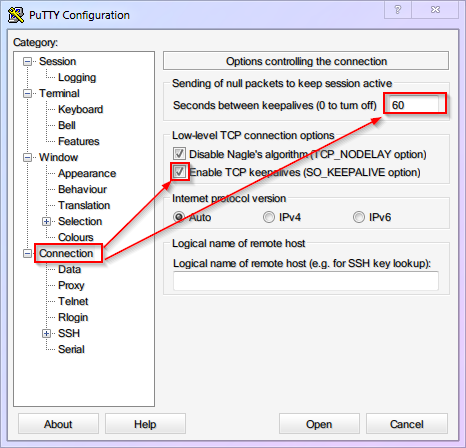
Any change you make in PuTTY must be saved manually to the session, or it will be lost after you close the window.
-
Click Open and log in with the SSH username and password from your provider. This article assumes the initial username is
root. Also note that Linux does not show asterisks when you type passwords. That is normal and your keyboard is not broken.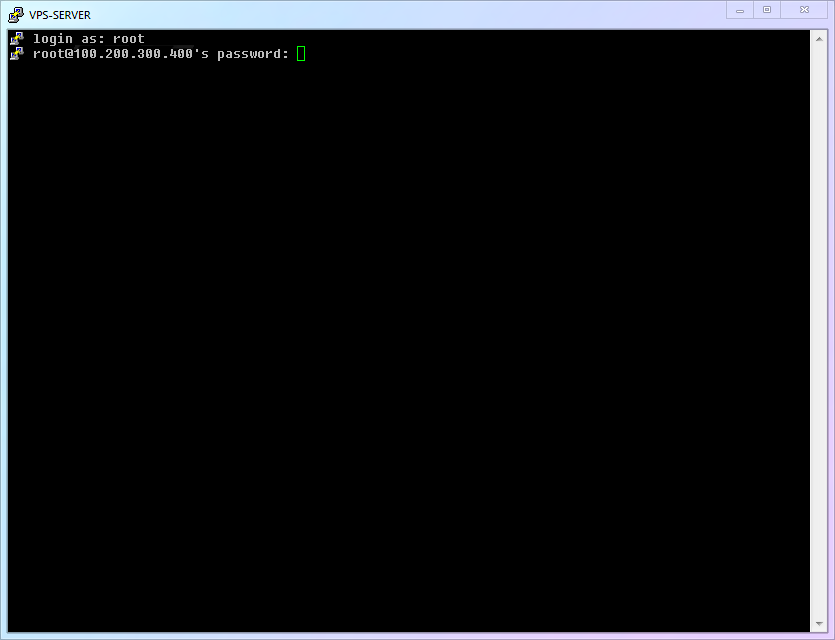
2.2 First look at the command-line interface
-
If the login succeeds, you should see a screen similar to the image below:
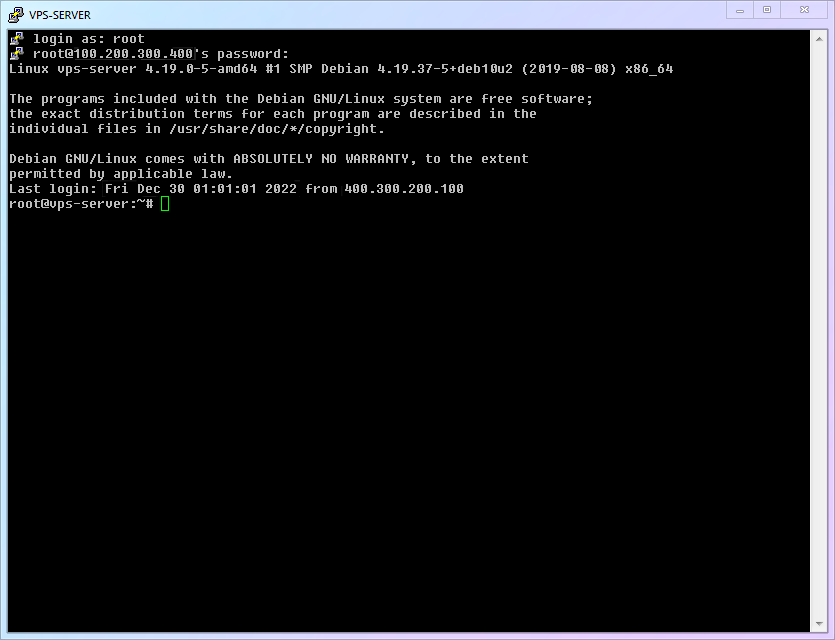
This screen is effectively the “desktop” of your remote server, but without icons, windows, or a mouse. It is a command-line interface, or CLI.
Everything that follows will happen in this environment. It may feel unfamiliar at first, but it is not scary or mysterious. At the end of the day, it is just a text-based way of doing things your mouse would normally do: you type one command, and the machine does one thing.
-
Take a moment to look around. Even this first screen tells you useful things such as the kernel version, last login time, and previous source IP. Your exact screen may differ depending on the provider.
-
Pay attention to the prompt at the bottom. It may look like
root@cloud-server:~#. That tells you:- The current user is
root - The server name is
cloud-server - The current directory is
~ - The cursor after
#is where you type commands
The third point is enough for now:
~means the current user’s home directory. The prompt symbol itself is less important. In this article, commands you need to type are shown without the prompt, so when copying commands, copy only the part after#or$. - The current user is
2.3 Update Linux for the first time
-
Linux updates work in a way that is not so different from updating apps on a phone. A package manager checks what has new versions, and then installs those updates.
-
On Linux, applications are usually called packages, and the program that manages them is the package manager. On Debian, that package manager is called
apt. We will use it to perform a full system update. -
Basic commands:
ID Command Description cmd-01apt updateRefresh package information cmd-02apt upgradeInstall package upgrades -
First, refresh the package information:
apt update -
Then run the upgrade and type
ywhen it asks(Y/n):apt upgrade -
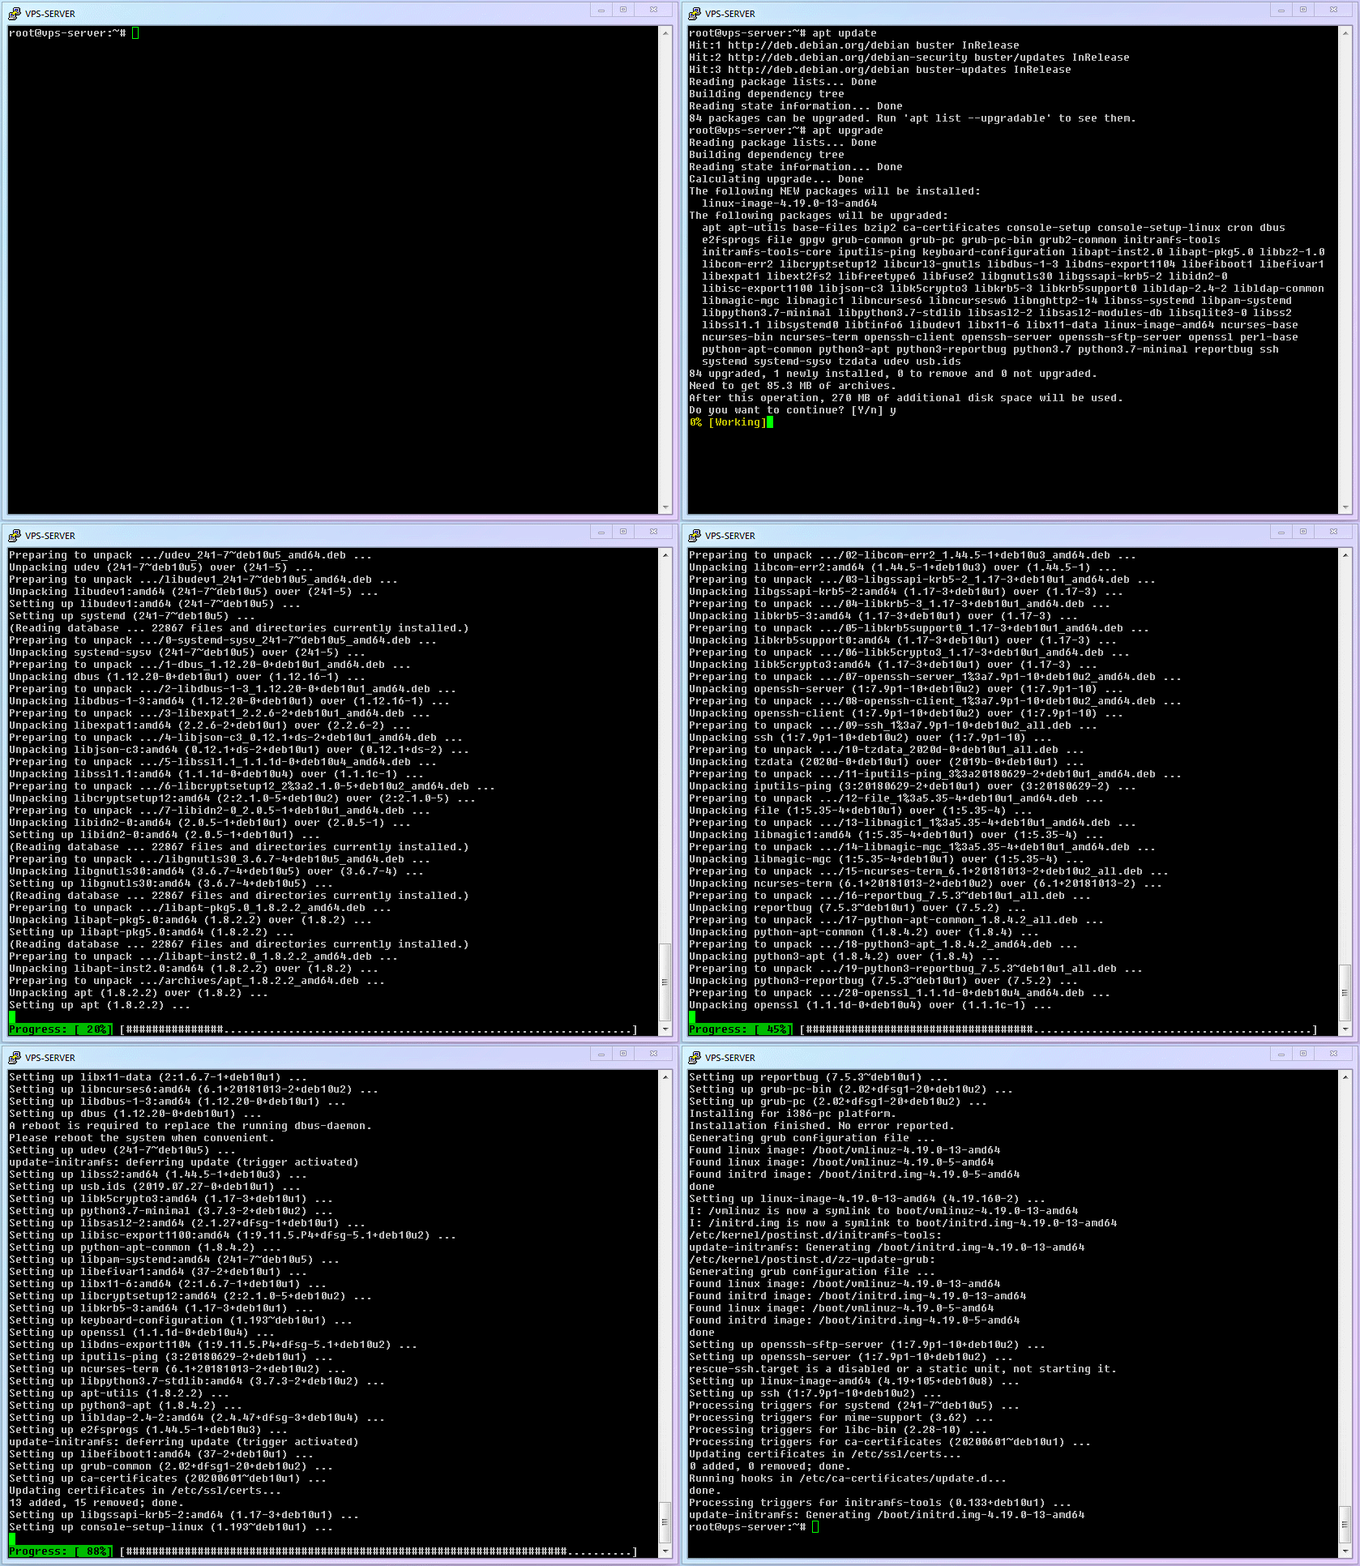
The full process looks like this:
3. Security Hardening
3.1 Why hardening matters
Linux server security is a huge topic. Countless websites, apps, services, and even physical infrastructure run on top of Linux. That means there is real money and real value at stake, which also means there is real motivation for attackers.
Now that you have a cloud server and plan to expose network services, you are stepping onto that battlefield, at least in a small way. Beginners often swing between two extremes: either “security has nothing to do with me” or “this is so serious that I am terrified.” Neither extreme helps.
- If you tend to underestimate security: try to learn more before you suffer a real loss.
- If you are overly anxious: do not panic. Your server is usually not a high-value target. What you are most likely to face are automated scans and login attempts. Basic hardening already goes a long way.
3.2 What are the actual risks?
As configured so far, anyone who knows these four things can log in to your server:
- IP address
- Port
- Username
- Password
Let us look at them one by one:
- IP address: scanners can probe random IP ranges, so you should treat it as effectively public.
- Port: if you keep the default, then the SSH port is
22. - Username: if you keep the default, the username is
root. - Password: this is the only one not publicly obvious. It is either generated by your provider or chosen by you.
If you leave everything else at the default, then three of the four elements are already known. Your entire server ends up depending on one password:
- If you keep a strong random password from the provider, that is relatively safe.
- If you change it to something weak like
123456, your server becomes trivial to break into. - If you reuse a more complex password from somewhere else, that is still unsafe because attackers use leaked-password lists and automation.
Attackers are not usually trying passwords by hand. Automated scripts do it for them 24/7.
Once the password is guessed, the attacker gets full access, often as root, and can quickly install malware or abuse your machine for crypto mining, spam, fraud, BT relay, or many other purposes. New users often do not notice unusual login records, processes, CPU usage, or network traffic, so compromises can stay hidden until the provider suspends the account or something more serious happens.
And remember: your cloud account often uses your real payment information, and your activity is tied to your IP address. Once abuse happens, it is not abstract anymore. It is connected to you.
3.3 What we are going to improve
Based on the analysis above, we are going to strengthen the last three elements:
- Port: change the SSH port away from
22(section 3.4) - Username: create a non-root user and disable root SSH login (sections 3.5 and 3.6)
- Password: switch SSH to key-based login and disable password authentication (section 3.7)
Follow the steps in order, or you may lock yourself out.
3.4 Change SSH to a non-default port
Now we fix the port = 22 problem. Some providers already assign a non-22 SSH port, in which case you can skip this step or still change it again if you want.
-
Basic commands:
ID Command Description cmd-03nanoText editor cmd-04systemctl restartRestart a service -
Configuration file:
ID Path Description conf-01/etc/ssh/sshd_configSSH server configuration -
Open the SSH configuration file with
nano:nano /etc/ssh/sshd_config -
Once the file opens, you will see that
nanoconveniently shows its important shortcuts at the bottom of the screen.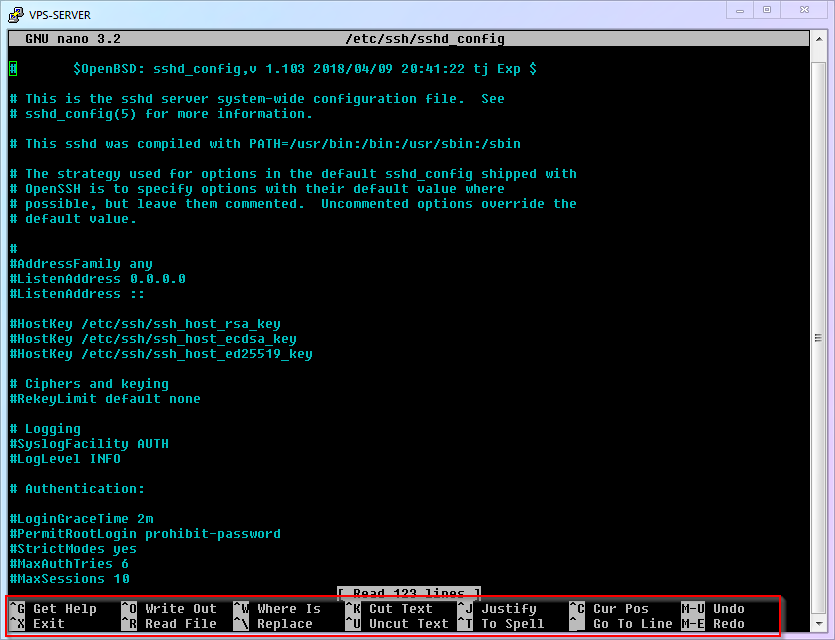
-
Find the
Portsetting and change it. In this article I use9753as an example. You can use any integer between1024and65535.- Press
Ctrl+W, search forPort 22, and press Enter. - Replace
22with9753. - If the line starts with
#, it is commented out and not active. Either remove the#or add a new uncommented line elsewhere.
Because this article is public, using
9753exactly can itself become a recognizable pattern. It is better to pick your own custom port. - Press
-
Save the file and exit:
- Save with
Ctrl+O, then press Enter - Exit with
Ctrl+X
If your system uses a firewall such as UFW, also allow the new SSH port so the server does not become unreachable after a restart:
sudo ufw allow 9753/tcp - Save with
-
Restart the SSH service:
systemctl restart sshThen try opening a new SSH session with the new port. If something goes wrong, the existing SSH session should still stay open, which lets you fix the config.
-
Full demo:
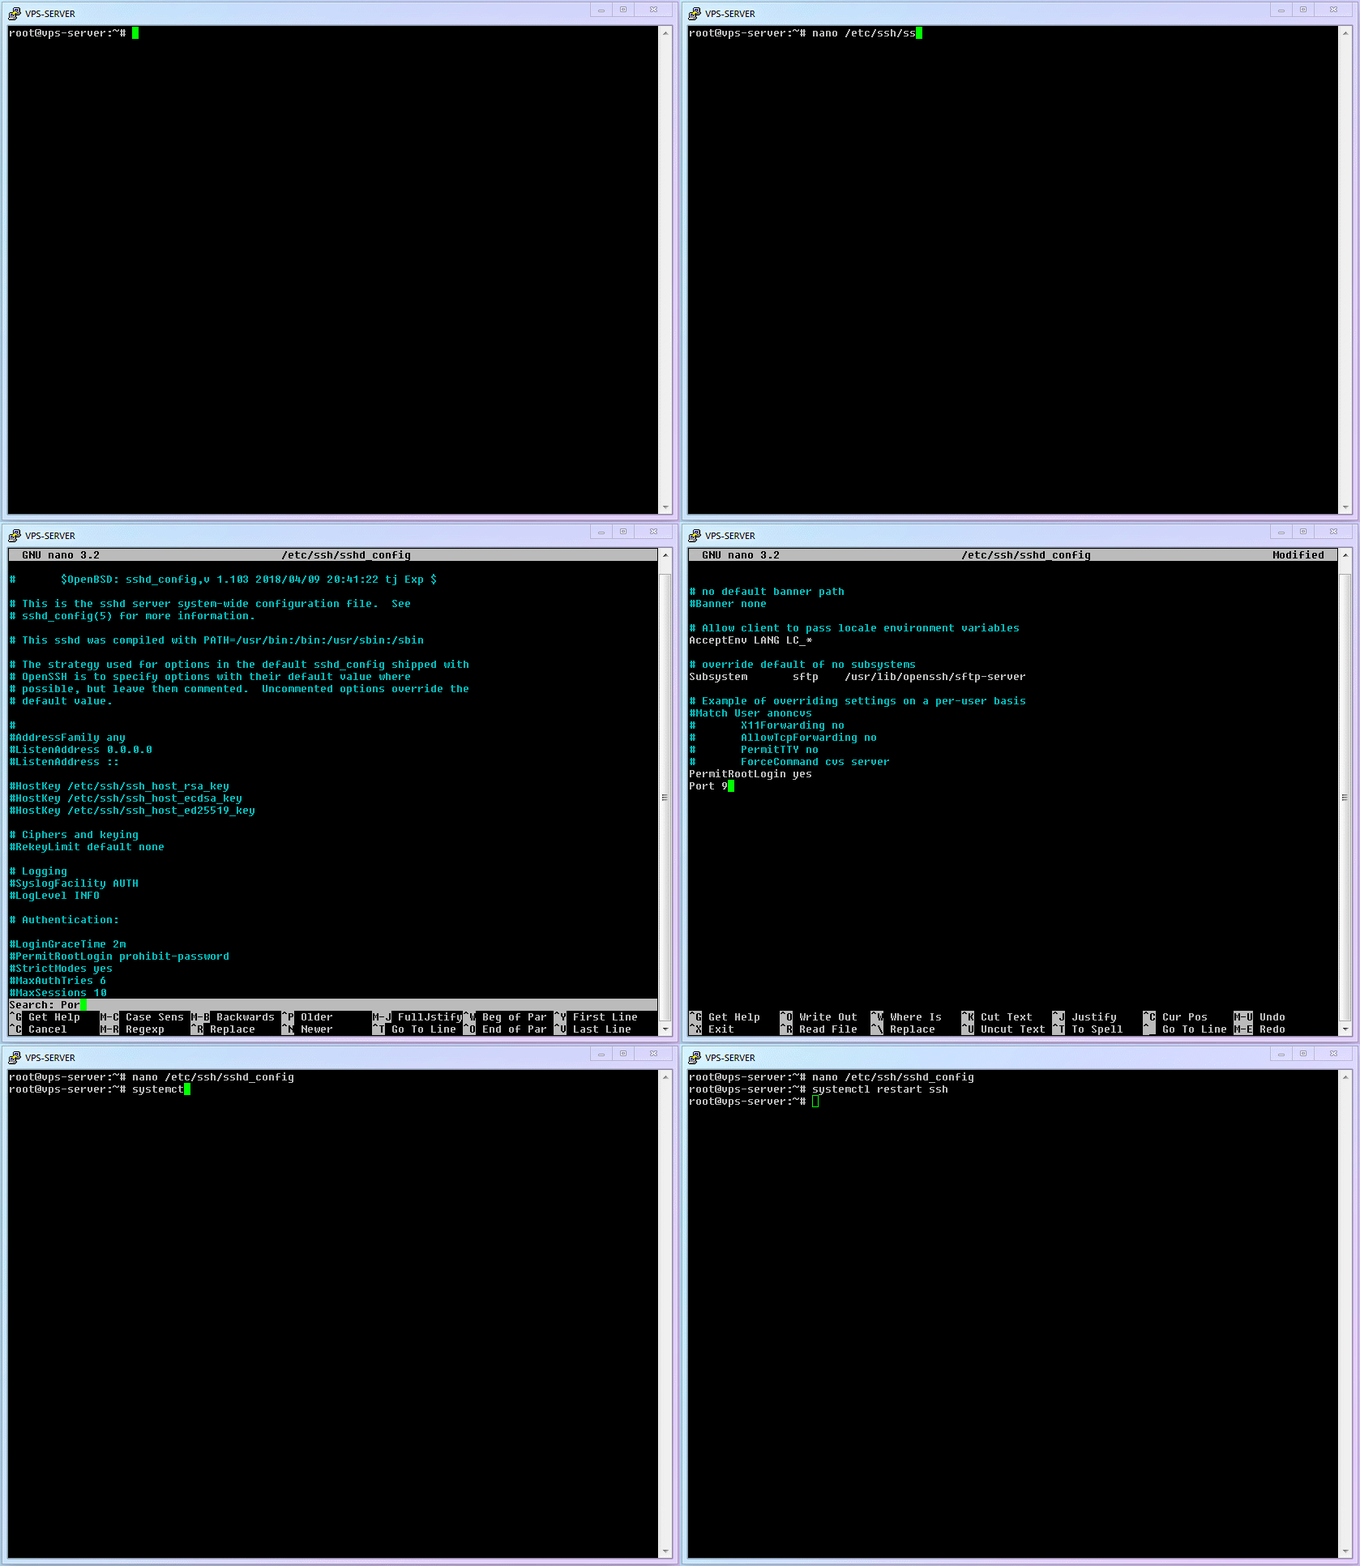
-
Update your PuTTY session to use the new port and save it again.
3.5 Create a non-root user
Next, we fix the username = root problem.
In Linux, root is not just “an administrator account.” It is the foundation of the whole system. If root is compromised, the whole machine is compromised. So let us reduce how often we use it.
-
Basic commands:
ID Command Description cmd-05adduserCreate a new user cmd-06apt installInstall a package cmd-07visudoSafely edit sudo permissions -
Create a new user and set its password. This article uses
adminas the example username:adduser adminFollow the prompts. Make sure you set a password. The additional profile fields can be left blank by pressing Enter.
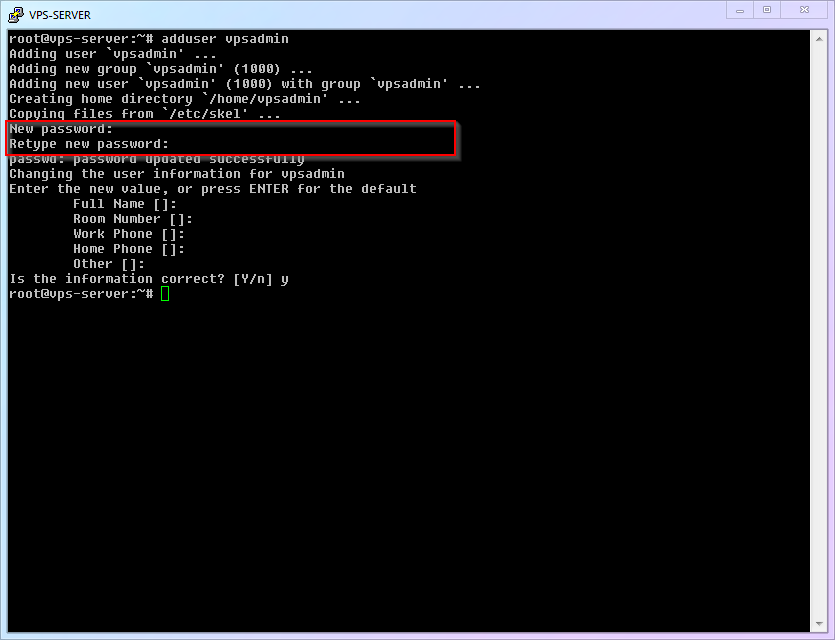
Just like with the SSH port, using
adminexactly can become a recognizable pattern. A custom username is better. -
Full demo:
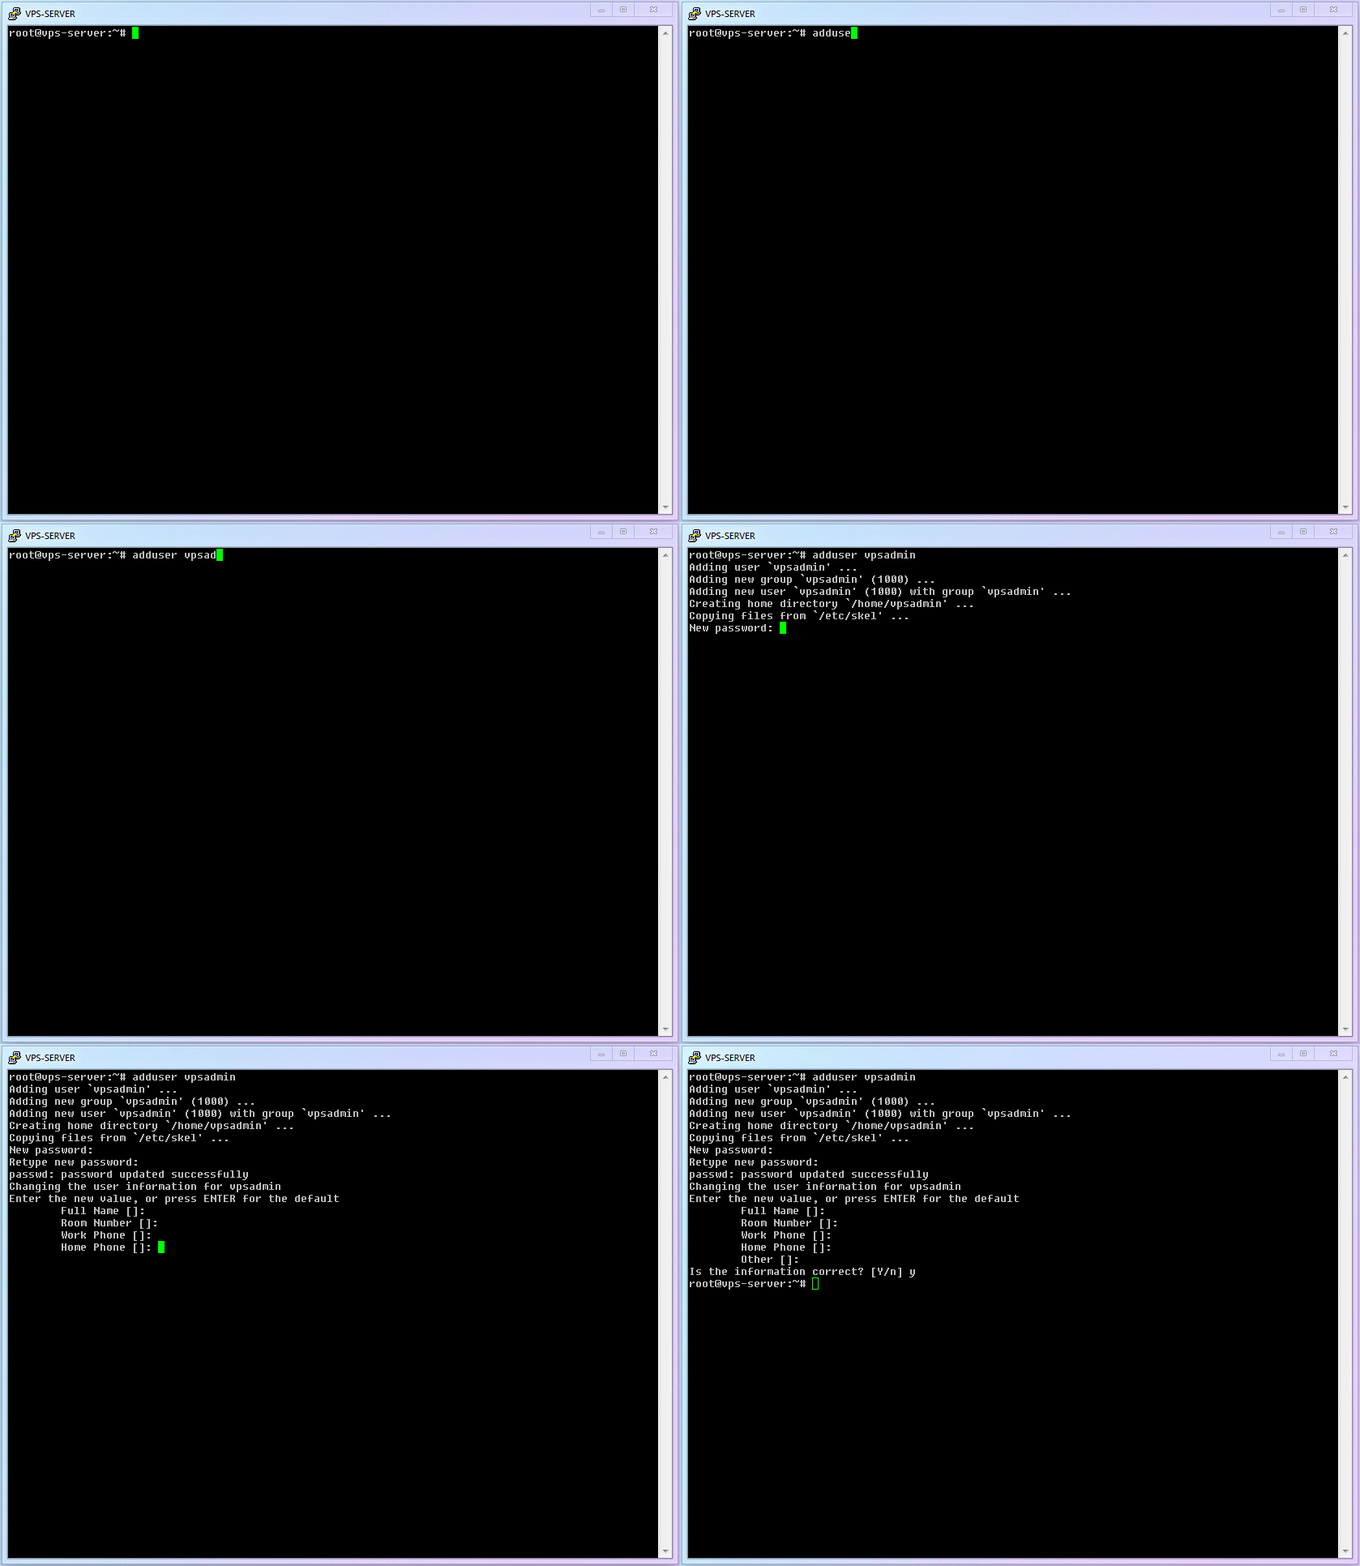
-
Install
sudoso the normal user can temporarily perform privileged operations when needed:apt update && apt install sudoThis line is actually two commands joined by
&&: refresh package metadata, then installsudo. -
Give the new user sudo privileges:
visudoUnder
User Privilege Specification, add:admin ALL=(ALL) NOPASSWD: ALLThe
NOPASSWDsetting means theadminuser does not need to type a password every time it usessudo. That goes against traditional security advice. I recommend it here because many beginners stick torootsimply to avoid repeated password prompts. In my opinion, the risk of usingrootdirectly is higher than the risk of a passwordlesssudosetup on a personal beginner server.If you prefer the traditional behavior, use:
admin ALL=(ALL:ALL) ALL -
Full demo:
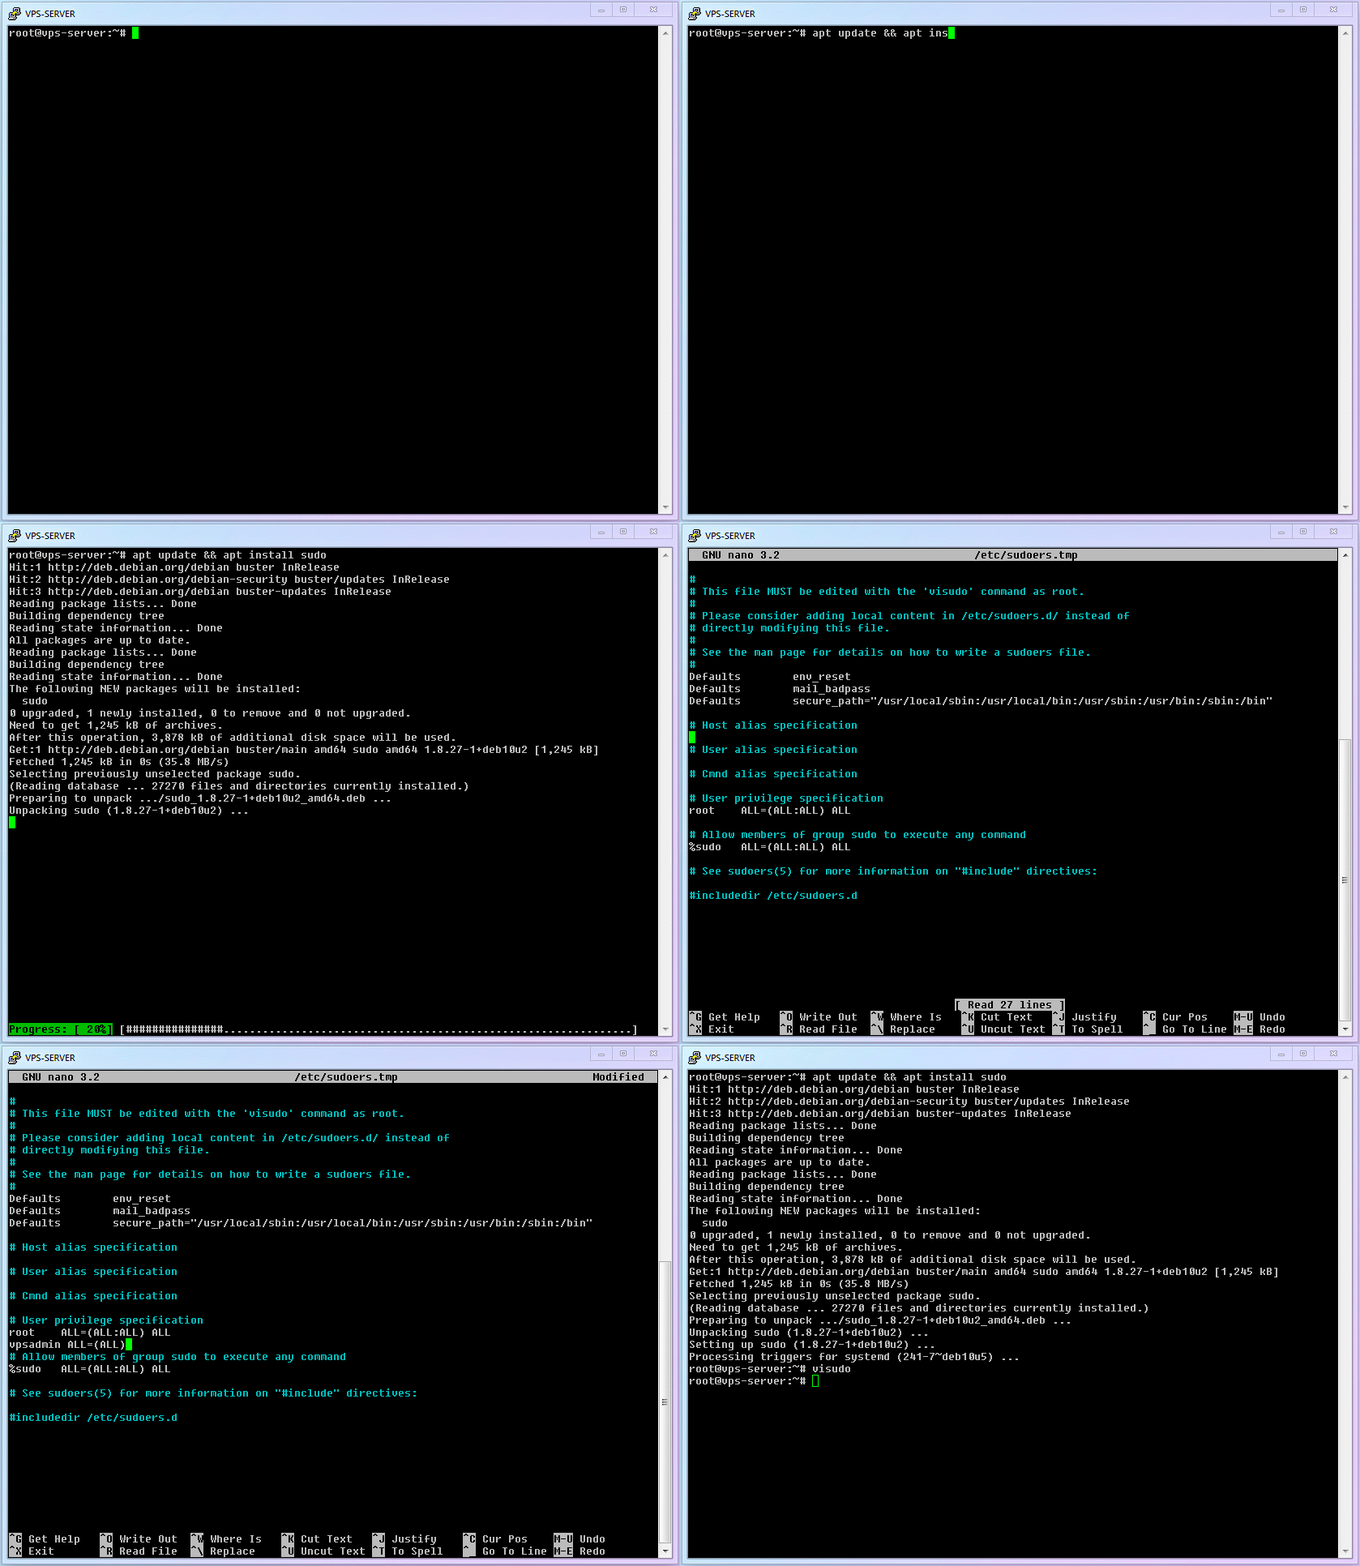
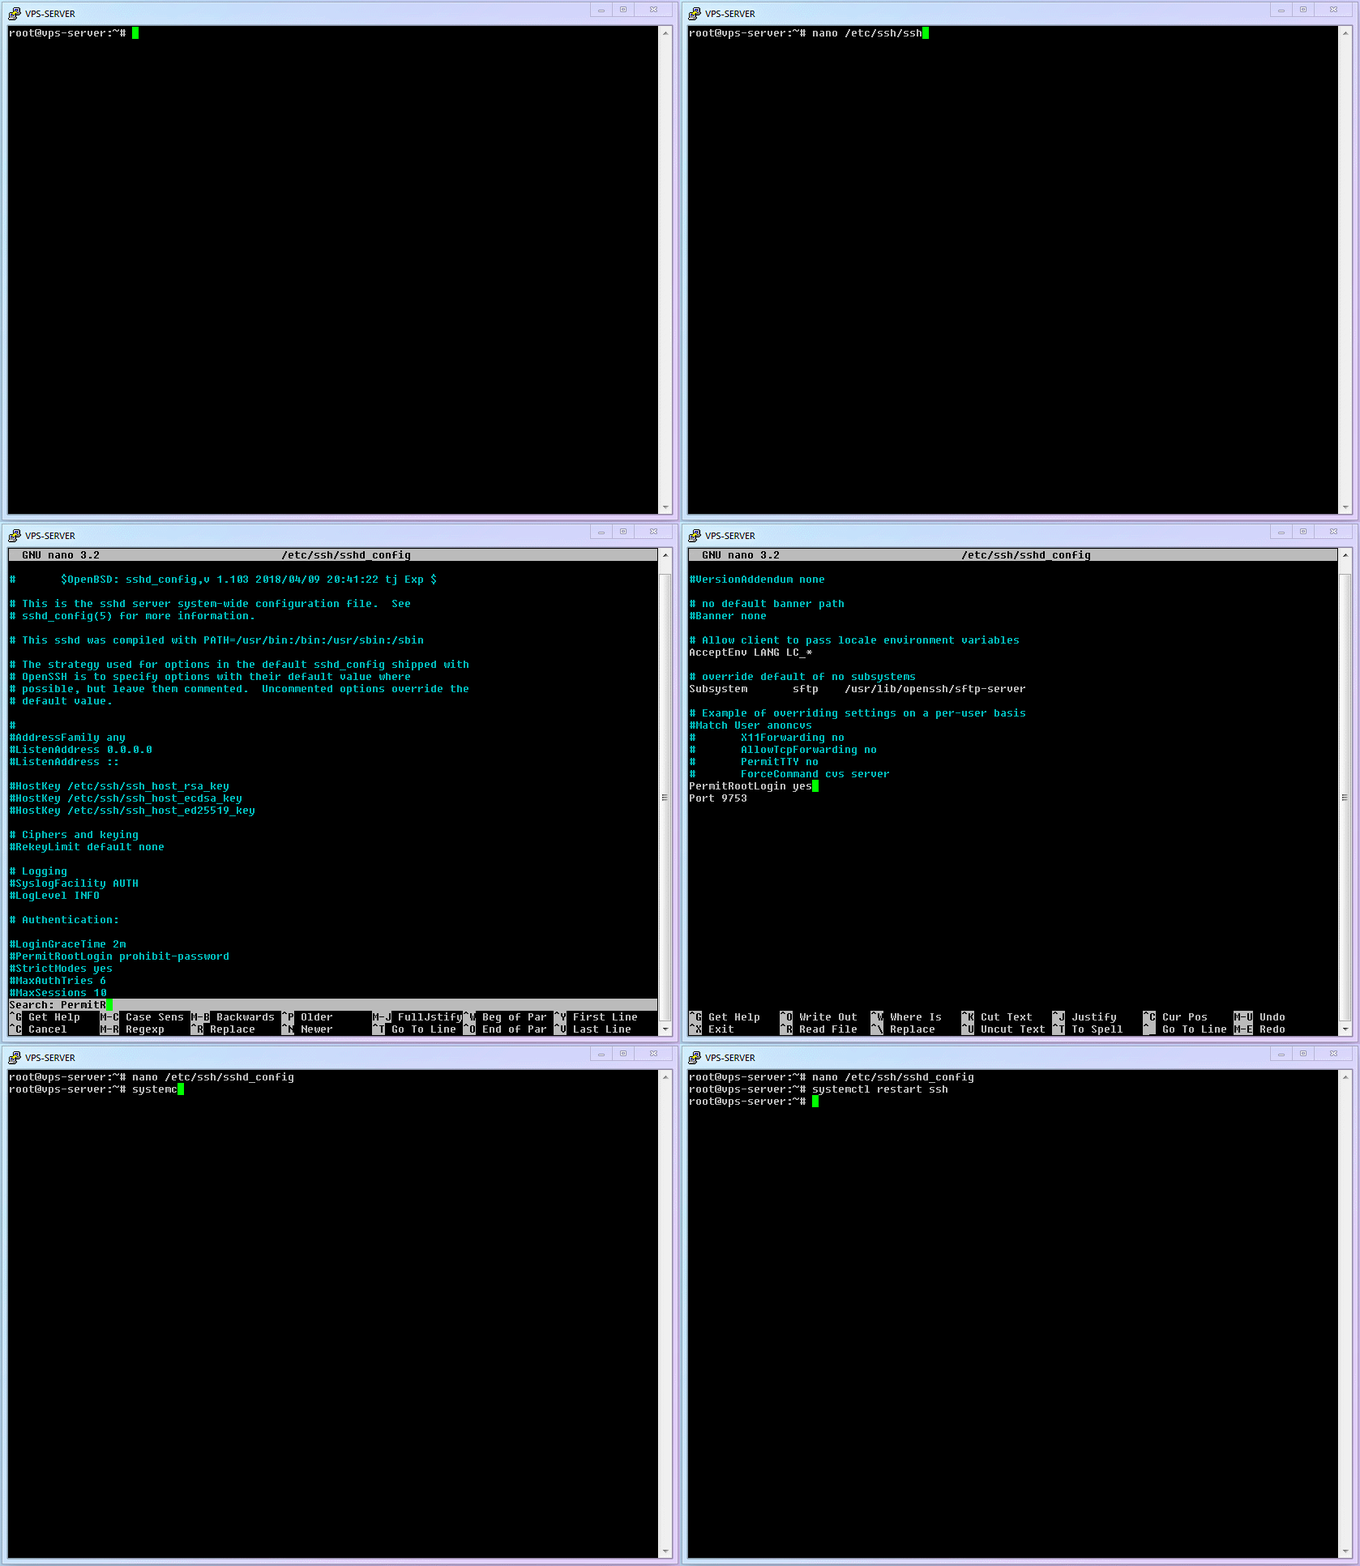
3.6 Disable SSH login for root
-
Open the SSH configuration again:
nano /etc/ssh/sshd_config -
Find
PermitRootLogin yesand change it tono.- Press
Ctrl+W, search forPermitRootLogin - Change
yestono
- Press
-
Save and exit:
Ctrl+O, then EnterCtrl+X
-
Restart SSH:
systemctl restart ssh -
Full demo:
-
The next time you log in through PuTTY,
rootwill no longer work. You should switch the default username toadmin(or whatever name you chose) and save the session.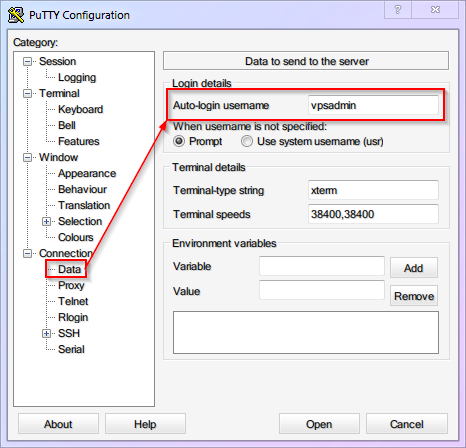
3.7 Use an SSH key and disable password login
Finally, we deal with password guessing.
Attackers rarely brute-force passwords the naive way. They usually use leaked-password lists and other shortcuts. Unless you are using a long, fully random password from a password manager, passwords are often weaker than people think.
To solve that, we can stop using password authentication entirely and switch to key-based authentication.
With key-based authentication, you generate a key pair: a public key and a private key. You upload the public key to the server. Each time you log in, SSH checks whether the private key on your computer matches the public key stored on the server. You do not need to remember or type a long password; you just need to keep the private key safe.
This article uses
RSAas the example because it has broad compatibility and a long support history across devices and SSH clients. It is still secure enough for typical use.Other common key types include:
DSA: mathematically obsolete and unsafe. Never use it.ECDSA: small and strong, but some people distrust it because of historical concerns about curve choices.Ed25519: a modern option with similar performance advantages and a cleaner reputation.If your device and software support it,
Ed25519is often the better modern choice.
Let us set up key-based authentication.
-
Open PuTTYgen from the Start menu.
-
Click Generate and move your mouse around the blank area to add randomness.
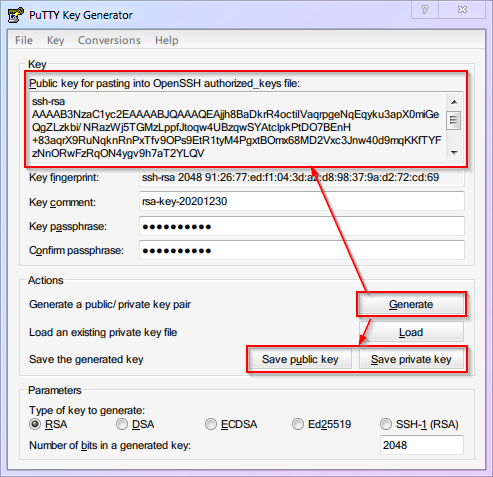
The screenshot uses a 2048-bit RSA key as the example. In practice, if you want security comparable to
ECDSA/Ed25519at 256 bits, use a 3072-bit RSA key. - Optionally set a passphrase on the private key for extra protection.
- Click Save public key and save it as
id_rsa.pub. - Click Save private key and save it as
id_rsa. PuTTY private keys use the.ppksuffix automatically. -
Most importantly, copy the full text from the upper text area and save it as a file named
authorized_keys. If you save it with VS Code and it becomesauthorized_keys.txt, that is fine. We will remove the.txtlater when uploading it.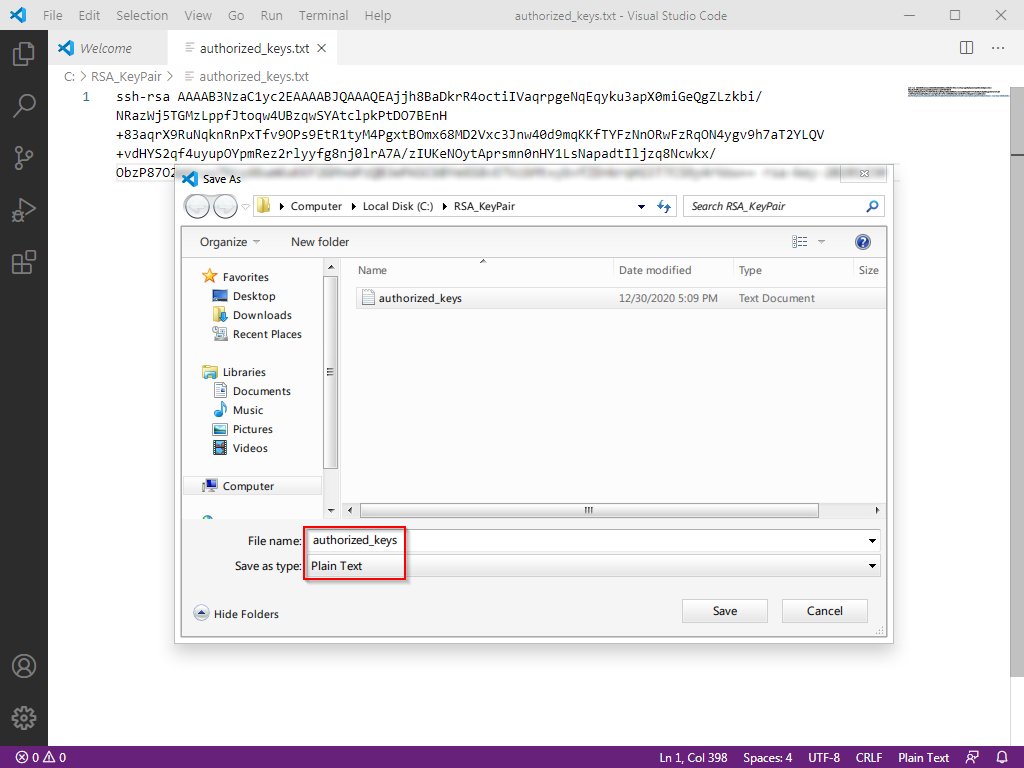
-
-
Upload the public key to the server under the
adminuser:- This is where WinSCP comes in.
-
Install it and import the PuTTY session if prompted.
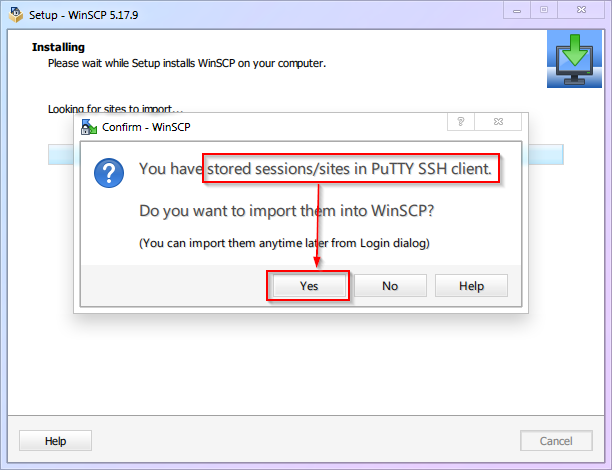
-
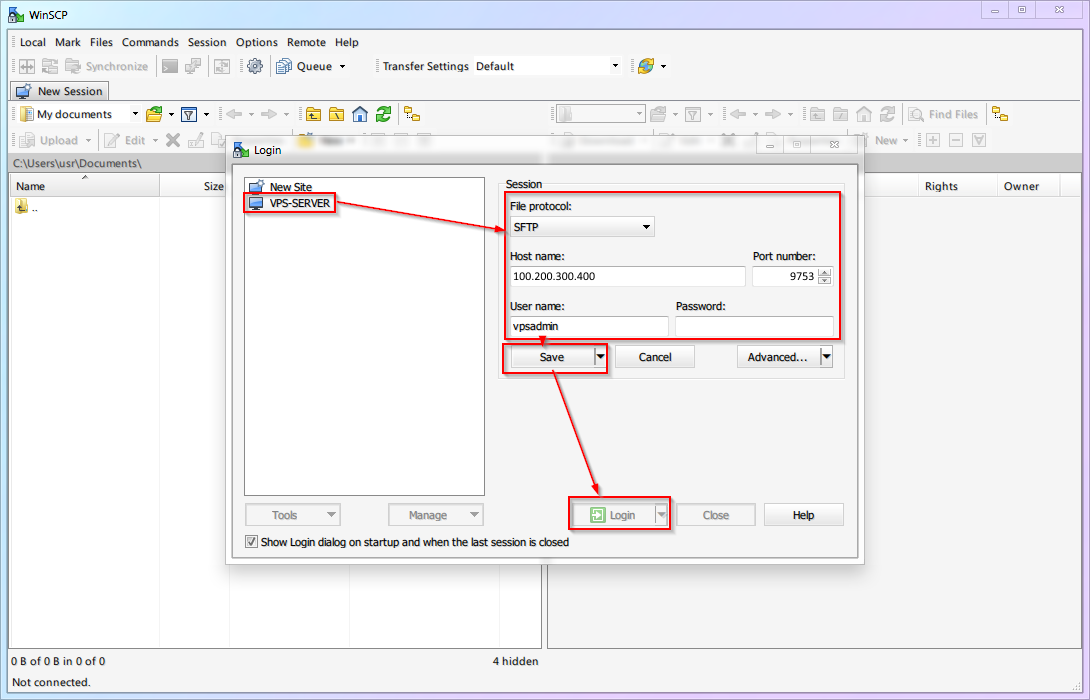
If you do not see the import prompt, configure the connection manually:
- The left panel is your local machine. Go to the folder where you saved the key files.
-
The right panel is the server, usually starting in
/home/admin/. ClickX hiddenso hidden files are visible.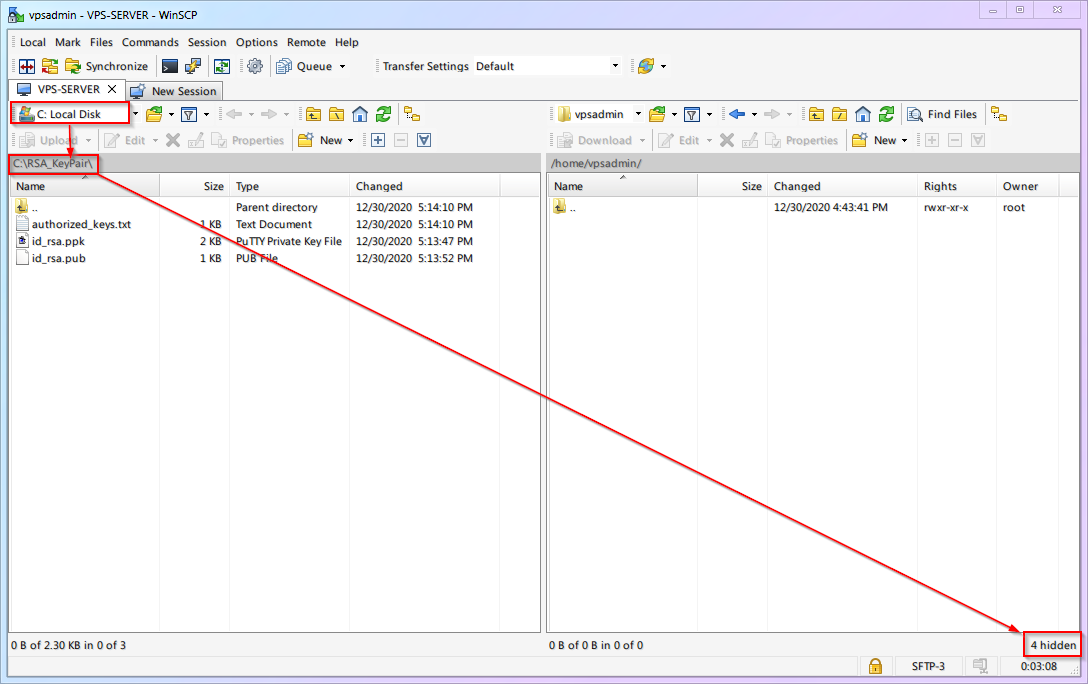
-
In the right panel, create a folder named
.ssh.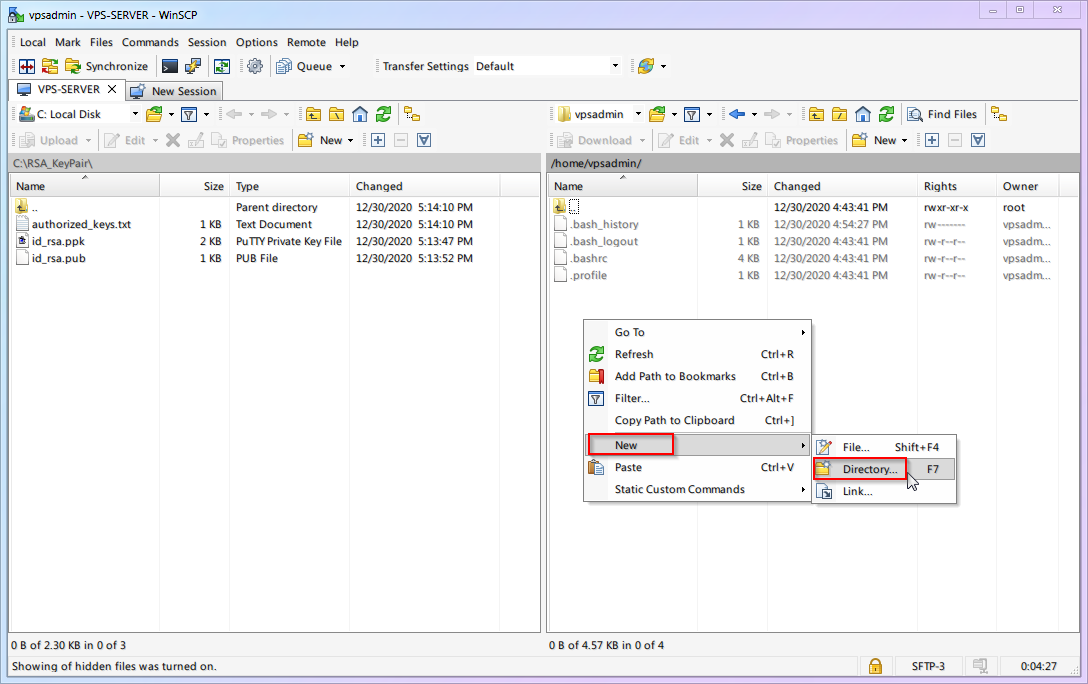
-
Upload the
authorized_keysfile into.ssh.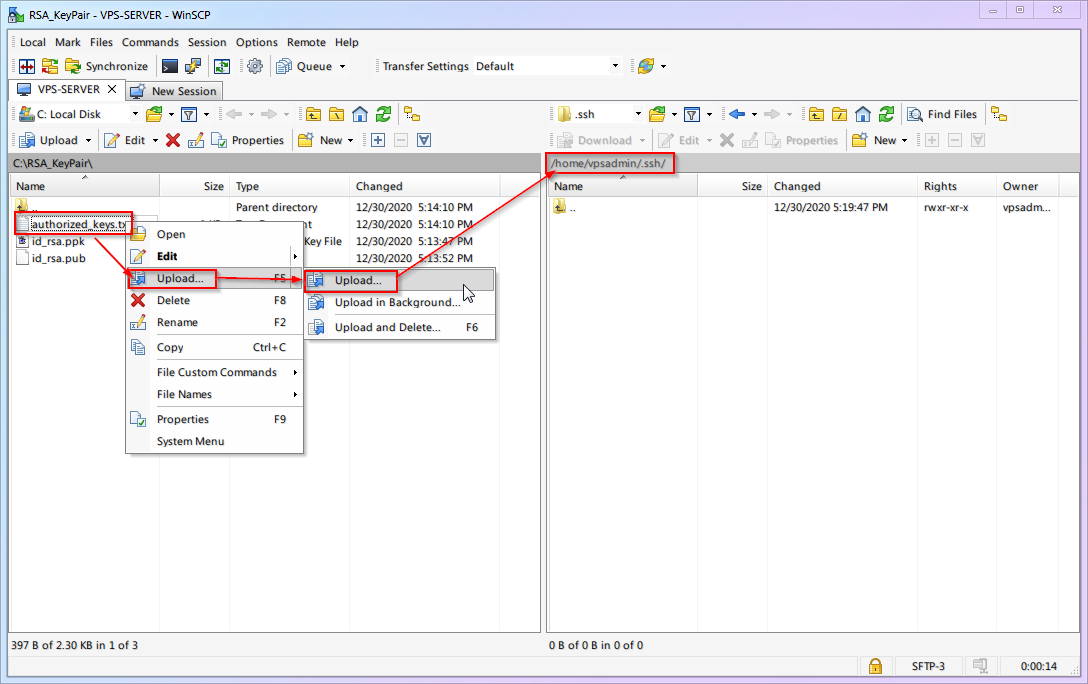
-
If the uploaded filename is
authorized_keys.txt, rename it toauthorized_keys.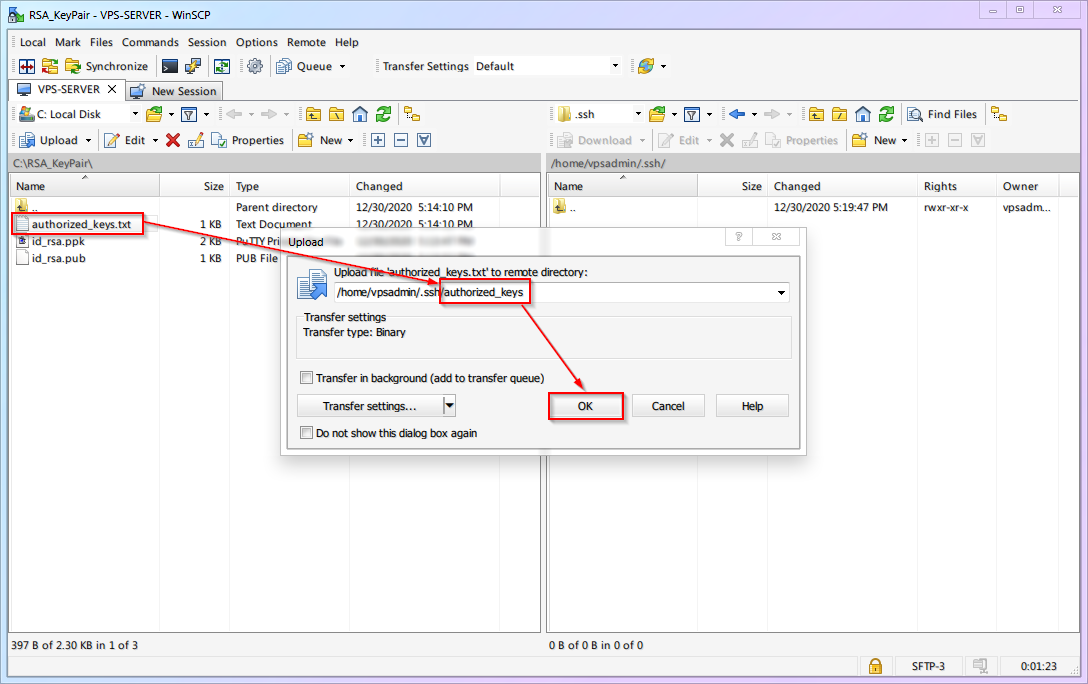
-
Full demo:
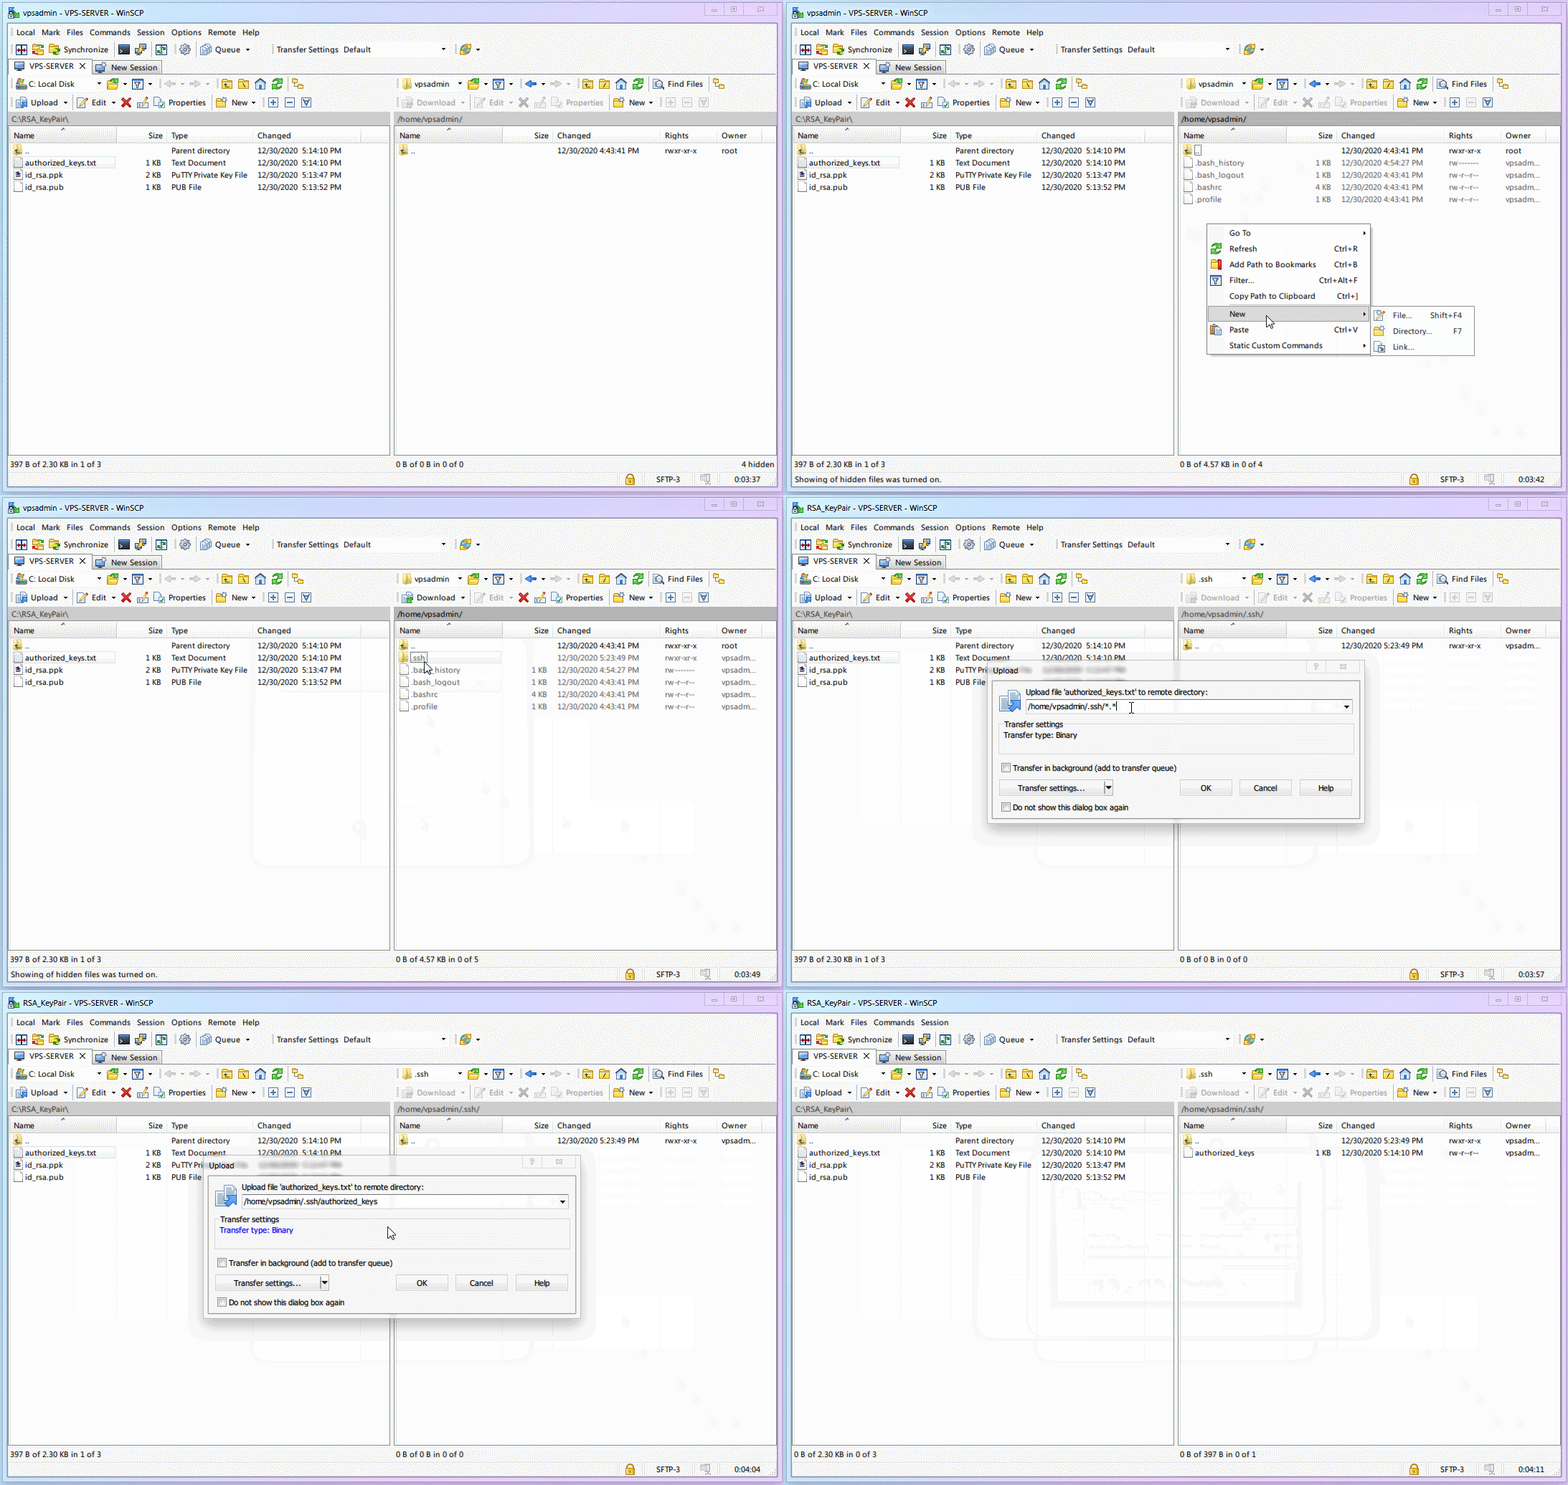
-
Configure the server to use key authentication and disable password authentication:
-
Basic commands:
ID Command Description cmd-08sudoRun a command with root privileges cmd-09chmodChange file or directory permissions -
Log in to the server through SSH.
-
Restrict the permissions on
authorized_keys:chmod 600 ~/.ssh/authorized_keys -
Open the SSH configuration with
sudo:sudo nano /etc/ssh/sshd_config - Find
PasswordAuthenticationand change it tono. - Find
PubkeyAuthenticationand make sure it isyes. Then save and exit. -
Restart SSH:
sudo systemctl restart ssh -
Full demo:
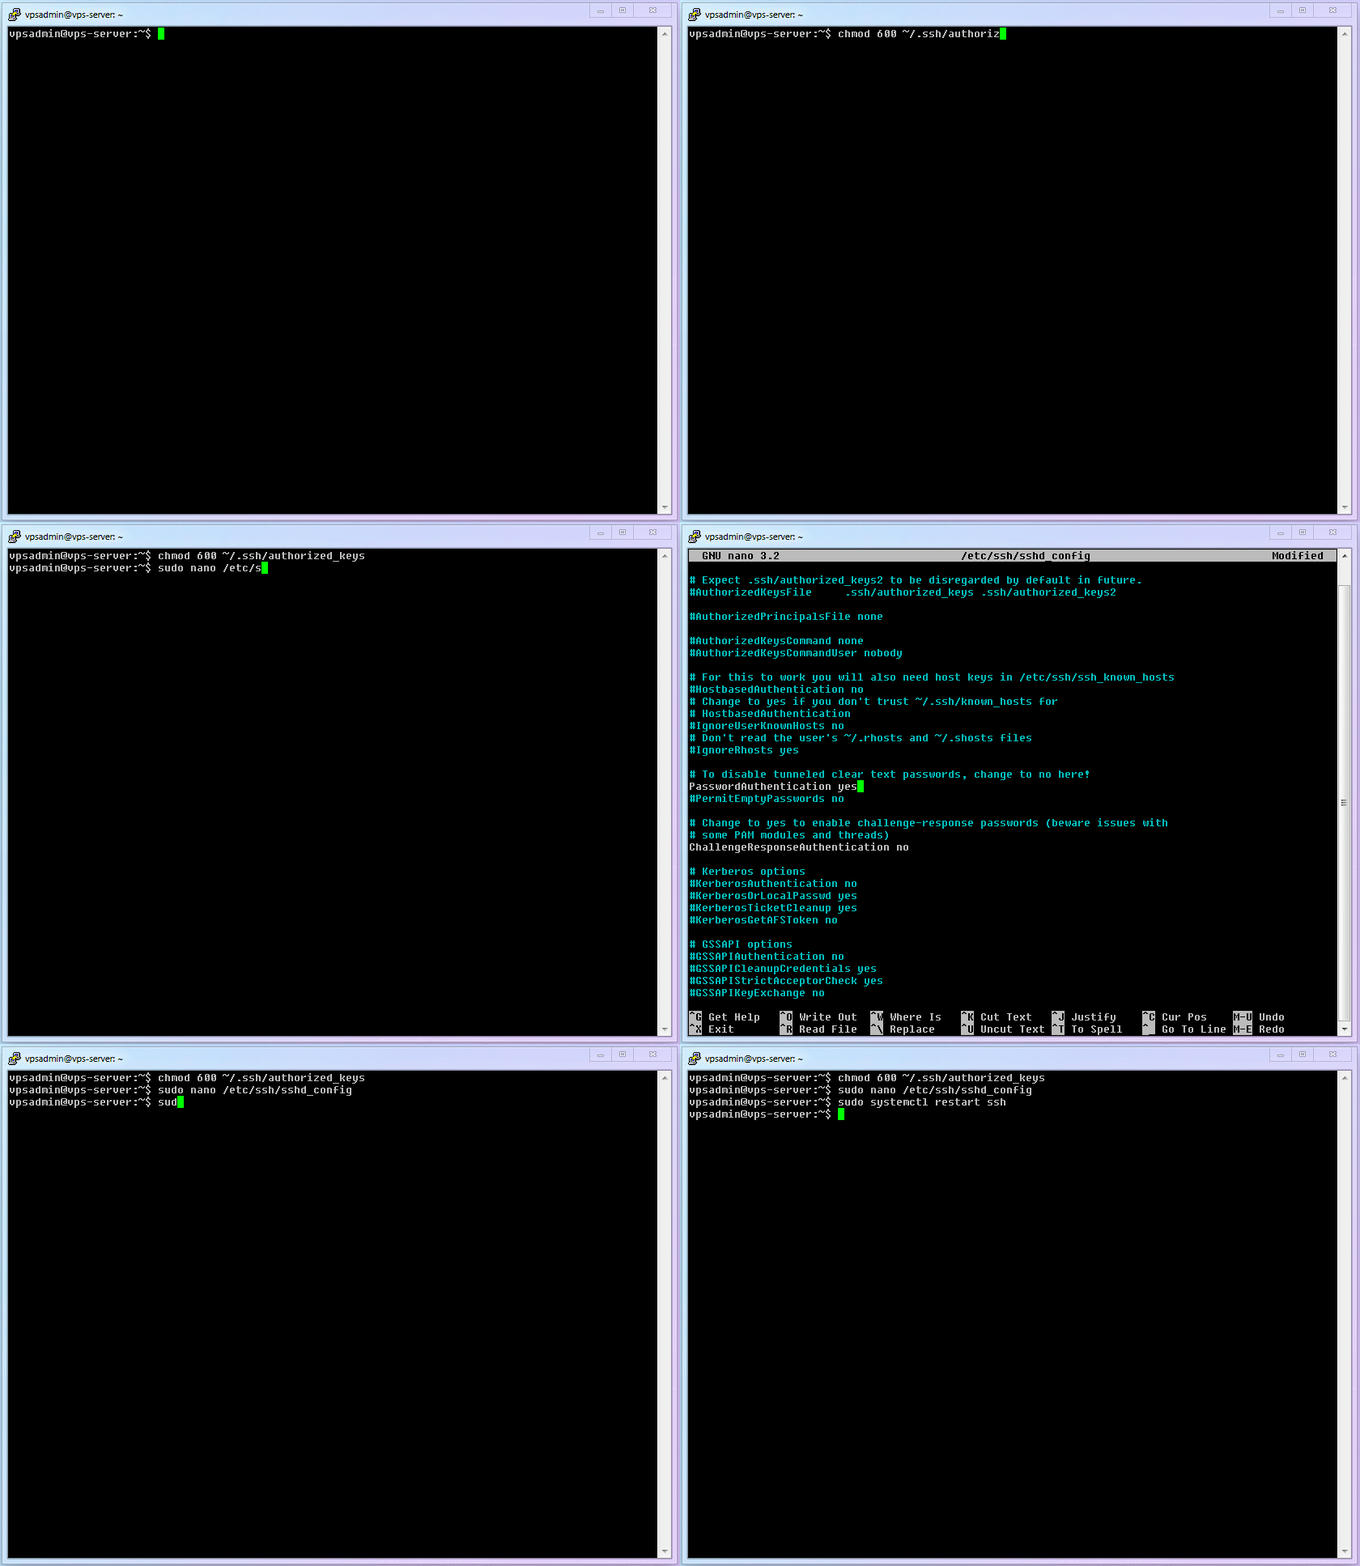
-
-
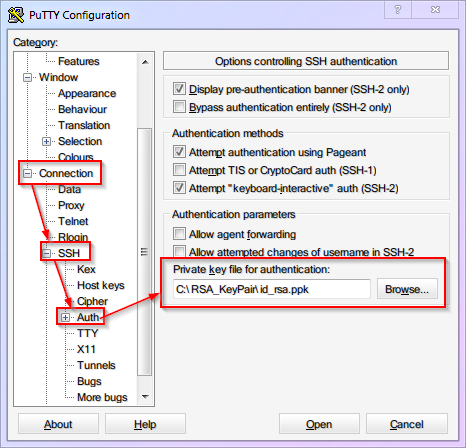
Now that the server trusts the public key, tell PuTTY where the matching private key lives. Do not forget to save the session afterward.
-
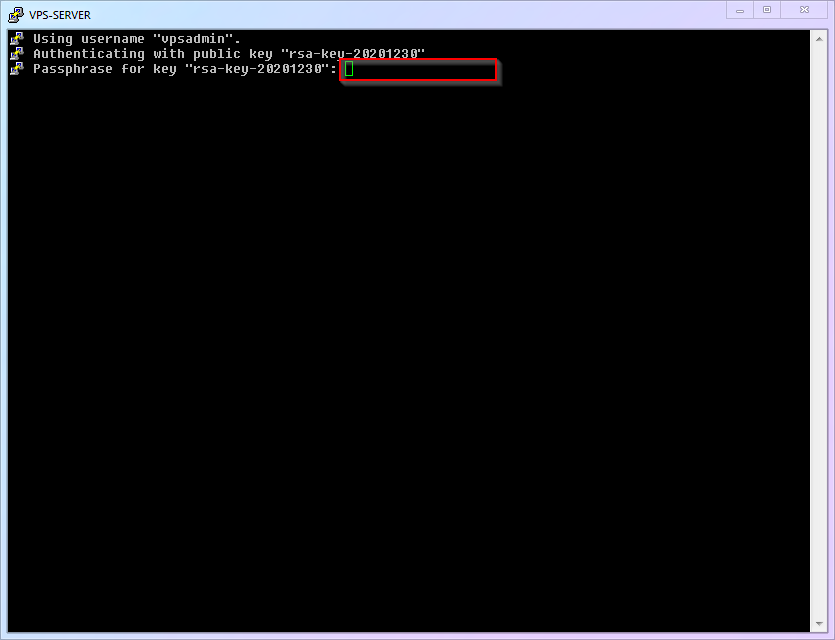
At this point, password authentication is disabled and key-based authentication is active. Future logins can be a one-click operation after you load the saved PuTTY session. If you set a passphrase on the private key, you will still need to type that passphrase when logging in.
-
Do not forget to configure WinSCP to use the same private key, or file transfers will stop working.
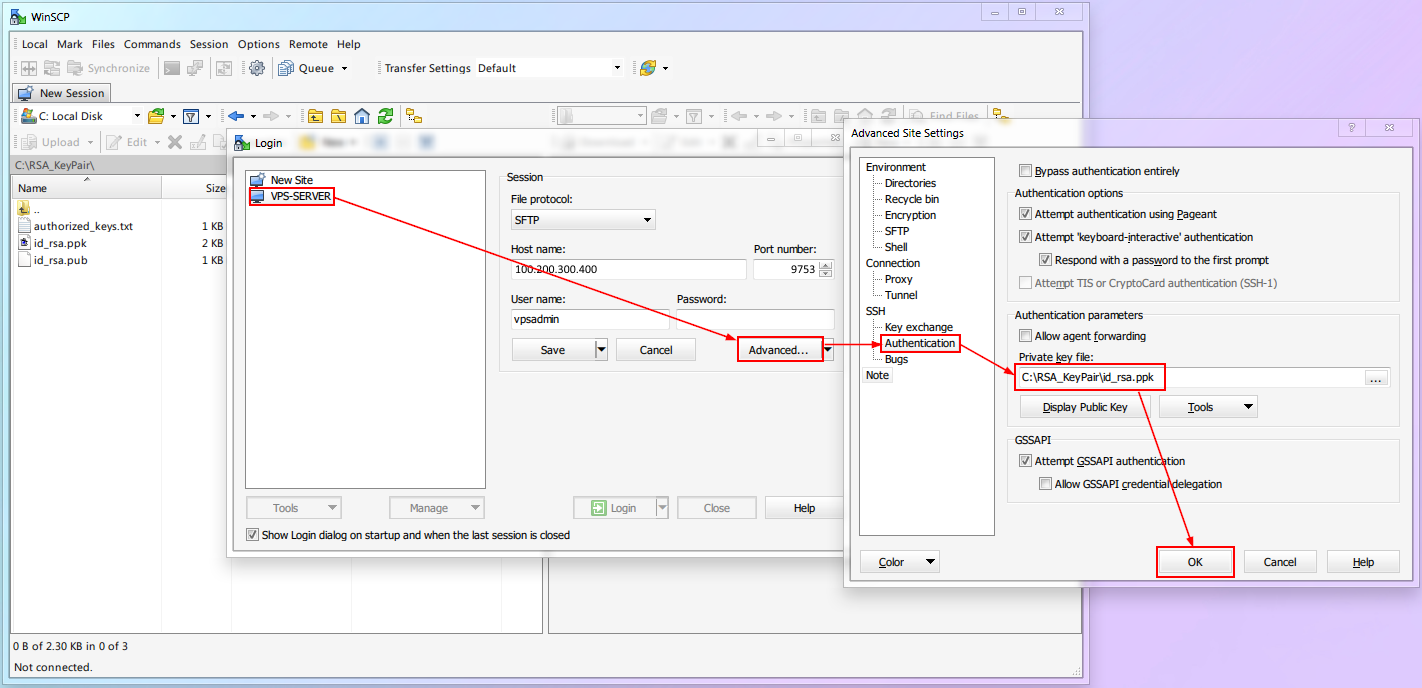
Any software that logs in through SSH will now need key-based authentication. There are too many such tools to show one by one, so configure them as needed.
4. Build the Website
4.1 Log in and install Nginx
-
The commands below should look familiar by now:
sudo apt update && sudo apt install nginx -
Once installation is complete, Nginx starts automatically. Open a browser on your local machine and visit
http://100.200.300.400:80. If you see the default Nginx page, the web server is running correctly.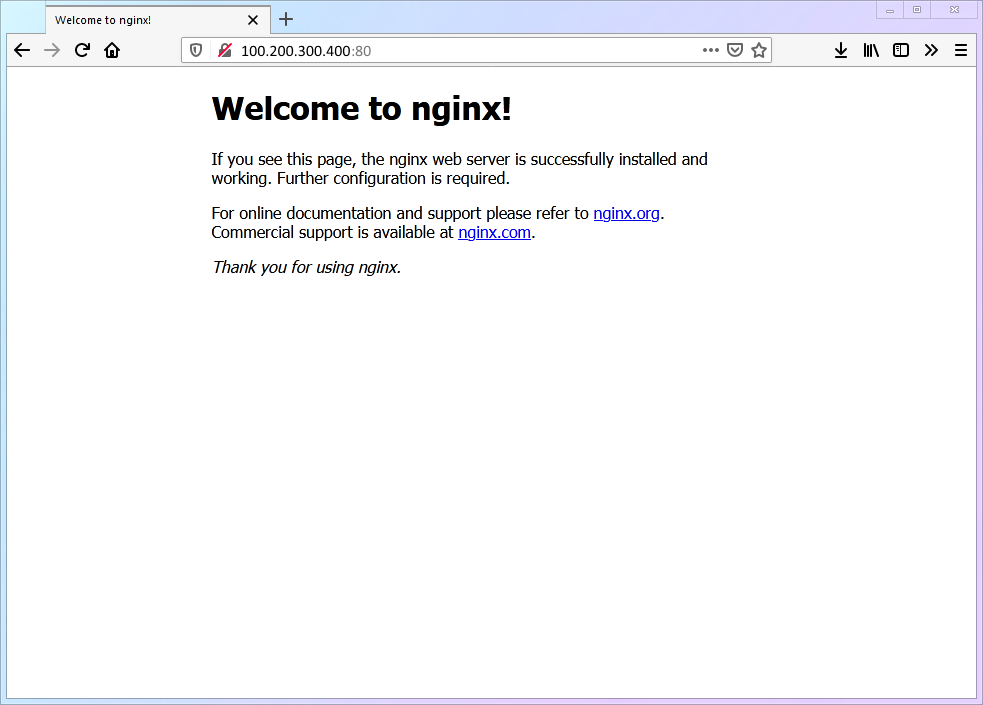
-
If you cannot see the default page, the firewall may still be blocking ports
80and443. On Debian, check UFW:sudo ufw statusIf the output shows only SSH rules, allow HTTP and HTTPS for Nginx:
sudo ufw allow 'Nginx Full'Then run
sudo ufw statusagain and verify thatNginx Fullis allowed.
4.2 Create the simplest possible web page
-
Basic commands:
ID Command Description cmd-10mkdirCreate a directory cmd-11systemctl reloadReload a service -
Configuration file:
ID Path Description conf-02/etc/nginx/nginx.confNginx configuration -
Create a site directory and an
index.htmlfile:mkdir -p ~/www/webpage/ && nano ~/www/webpage/index.htmlIf your username is not
admin, make sure you understand what~means:- For a non-root user,
~means/home/<username> - For
root,~means/root
- For a non-root user,
-
Paste the following HTML into the file, then save and exit:
<!DOCTYPE html>
<html lang="en">
<head>
   <meta charset="UTF-8">
   <meta name="viewport" content="width=device-width, initial-scale=1.0">
   <title>My Personal Web Page</title>
   <style>
      body {
            font-family: Arial, sans-serif;
            margin: 0;
            padding: 0;
            background-color: #f4f4f4;
      }
      header {
            background-color: #333;
            color: #fff;
            padding: 10px 0;
            text-align: center;
      }
      main {
            padding: 20px;
      }
      footer {
            background-color: #333;
            color: #fff;
            text-align: center;
            padding: 10px 0;
            position: fixed;
            width: 100%;
            bottom: 0;
      }
   </style>
</head>
<body>
   <header>
      <h1>Welcome to My Personal Web Page</h1>
   </header>
   <main>
      <h2>About Me</h2>
      <p>Hello! My name is [Your Name]. I am passionate about [Your Interests]. This is a brief introduction about myself.</p>

      <h2>My Hobbies</h2>
      <ul>
            <li>Hobby 1</li>
            <li>Hobby 2</li>
            <li>Hobby 3</li>
      </ul>

      <h2>Contact Me</h2>
      <p>You can reach me at: <a href="mailto:[email protected]">[email protected]</a></p>
   </main>
   <footer>
      <p>© 2024 [Your Name]. All rights reserved.</p>
   </footer>
</body>
</html>
Then give other users permission to read the files:
chmod -R a+r . -
Edit
nginx.confand tell Nginx to serve that page on port80:sudo nano /etc/nginx/nginx.confAdd the following
serverblock insidehttp {}. Replace the domain name with your real one, including the subdomain:server { listen 80; server_name www.example.com; root /home/admin/www/webpage; index index.html; }As mentioned above, make sure
/home/admin/www/webpagematches your actual file path.Reload Nginx:
sudo systemctl reload nginxFull demo:
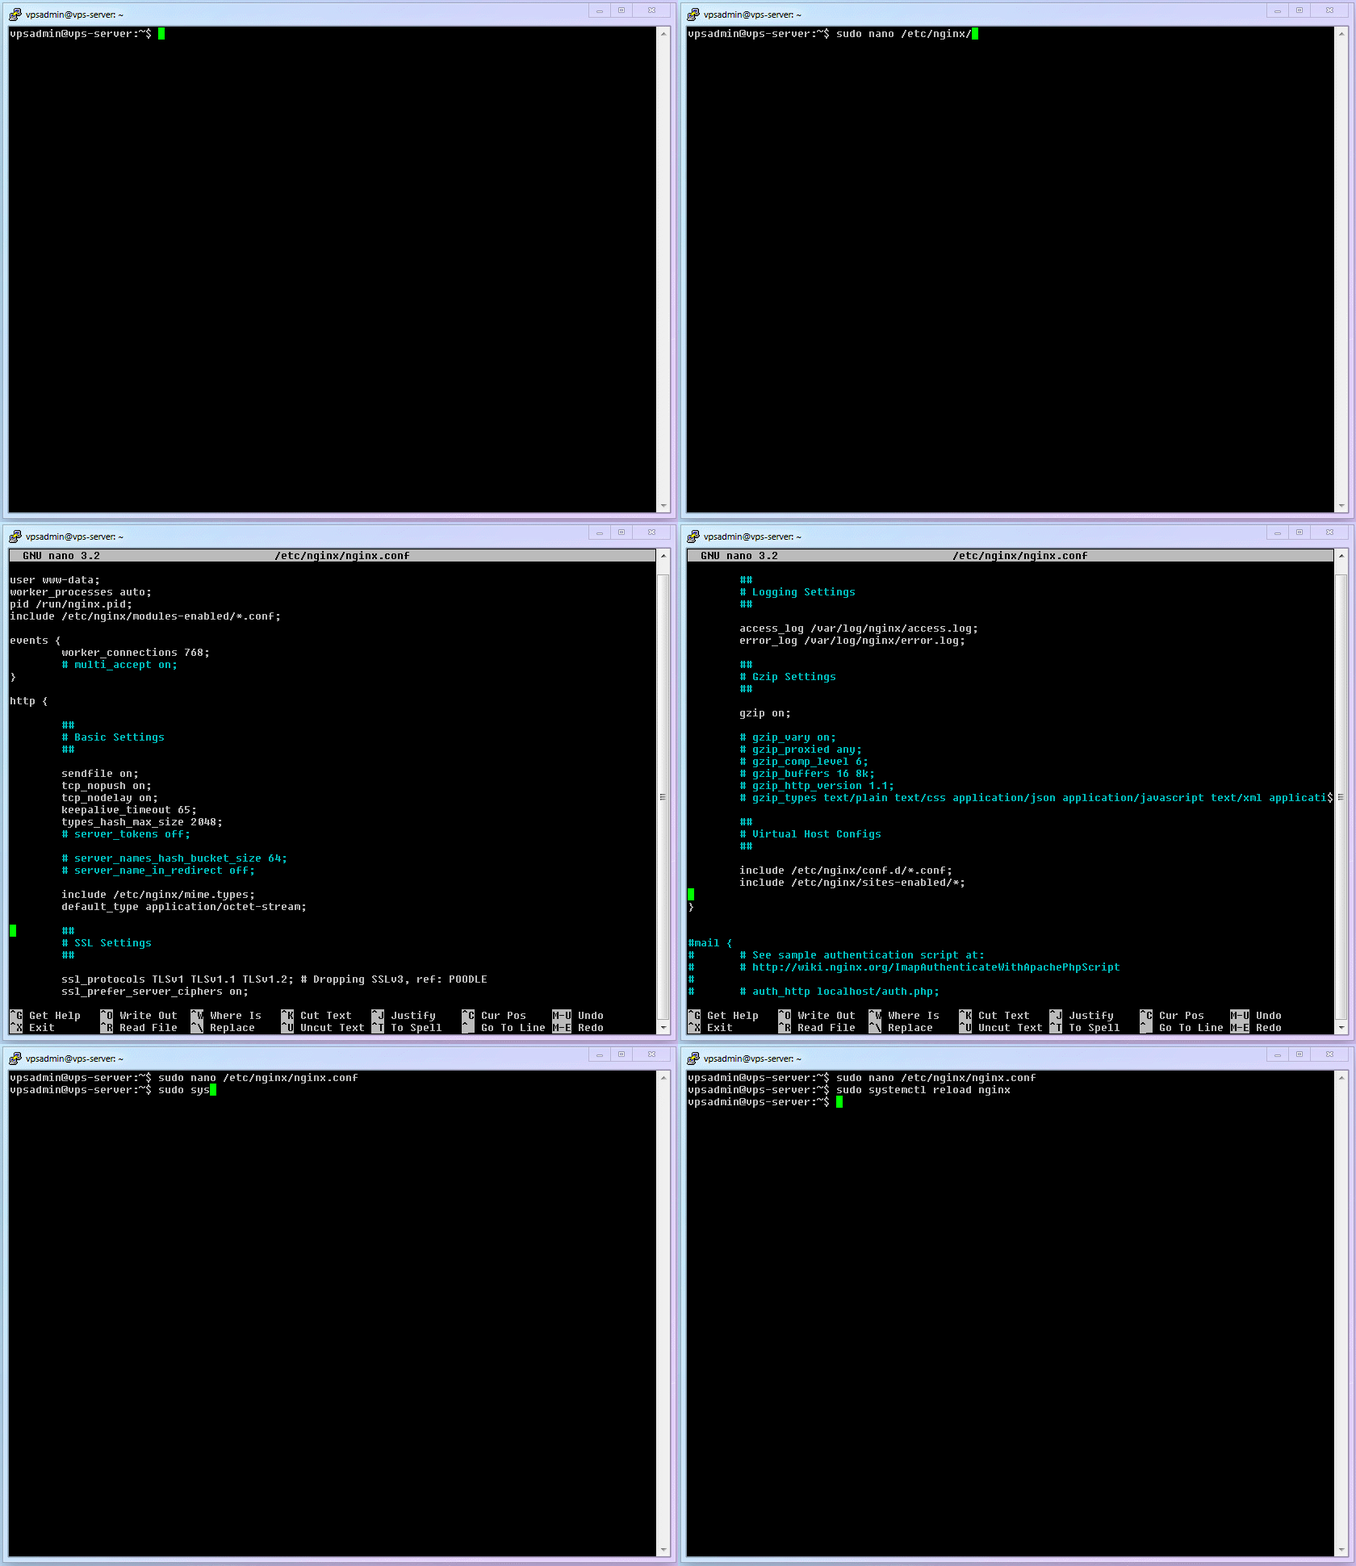
-
Now if you visit
http://www.example.com, you should see your page: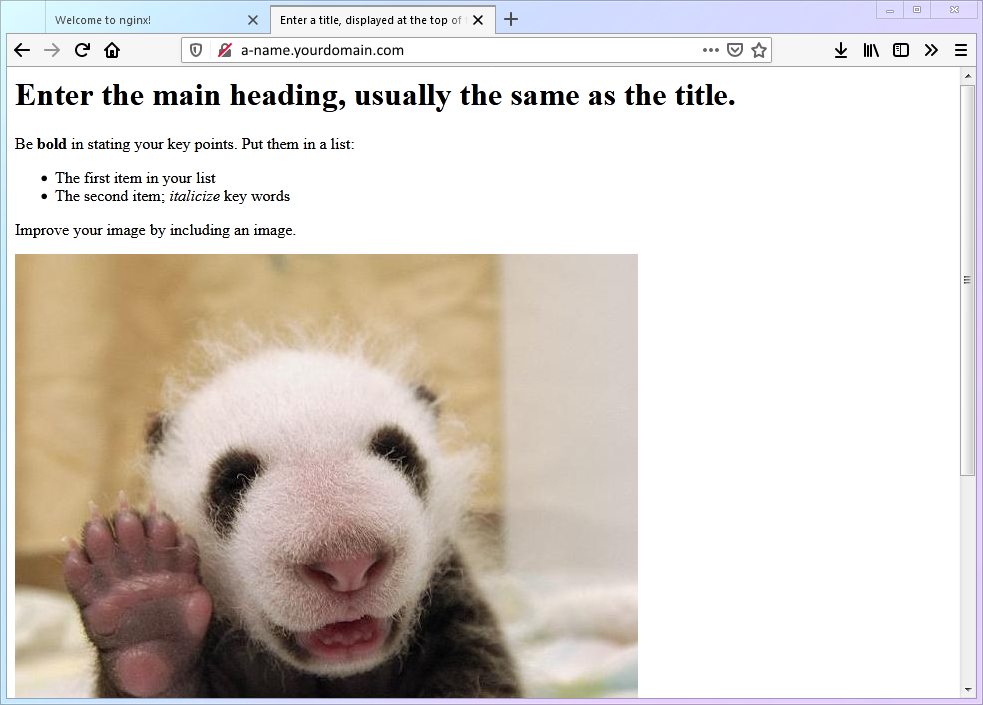
4.3 Common mistakes at this stage
If you follow the article carefully, this section is usually where things still go wrong only because of small oversights.
In practice, there are two common problems:
- The path in
nginx.confdoes not match the actual path to your site files. - The path is correct, but Nginx does not have permission to read the files.
And there are two common causes:
- You switched away from
root, but copied paths from the article without adapting them to your own username. - You insisted on using
rootand now the path assumptions no longer match the article’s structure.
If something breaks, go back and carefully re-read the path notes in section 4.2.
5. Certificate Management
5.1 Apply for a TLS certificate
Now we will request a real TLS certificate for the domain so the site supports encrypted HTTPS access.
Do not casually use self-signed certificates. They do not simplify things much, and they introduce unnecessary trust risks.
This article uses acme.sh, which is simple, lightweight, efficient, and supports automatic renewal.
From here on, commands already introduced earlier are not explained again in detail.
5.2 Install acme.sh
-
Basic commands:
ID Command Description cmd-12wgetFetch or download a file cmd-13acme.shCertificate-management commands -
Run the installer:
wget -O - https://get.acme.sh | sh -
Reload your shell so the
acme.shcommand becomes available:. .bashrc -
Enable automatic self-upgrade for
acme.sh:acme.sh --upgrade --auto-upgrade -
Full demo:
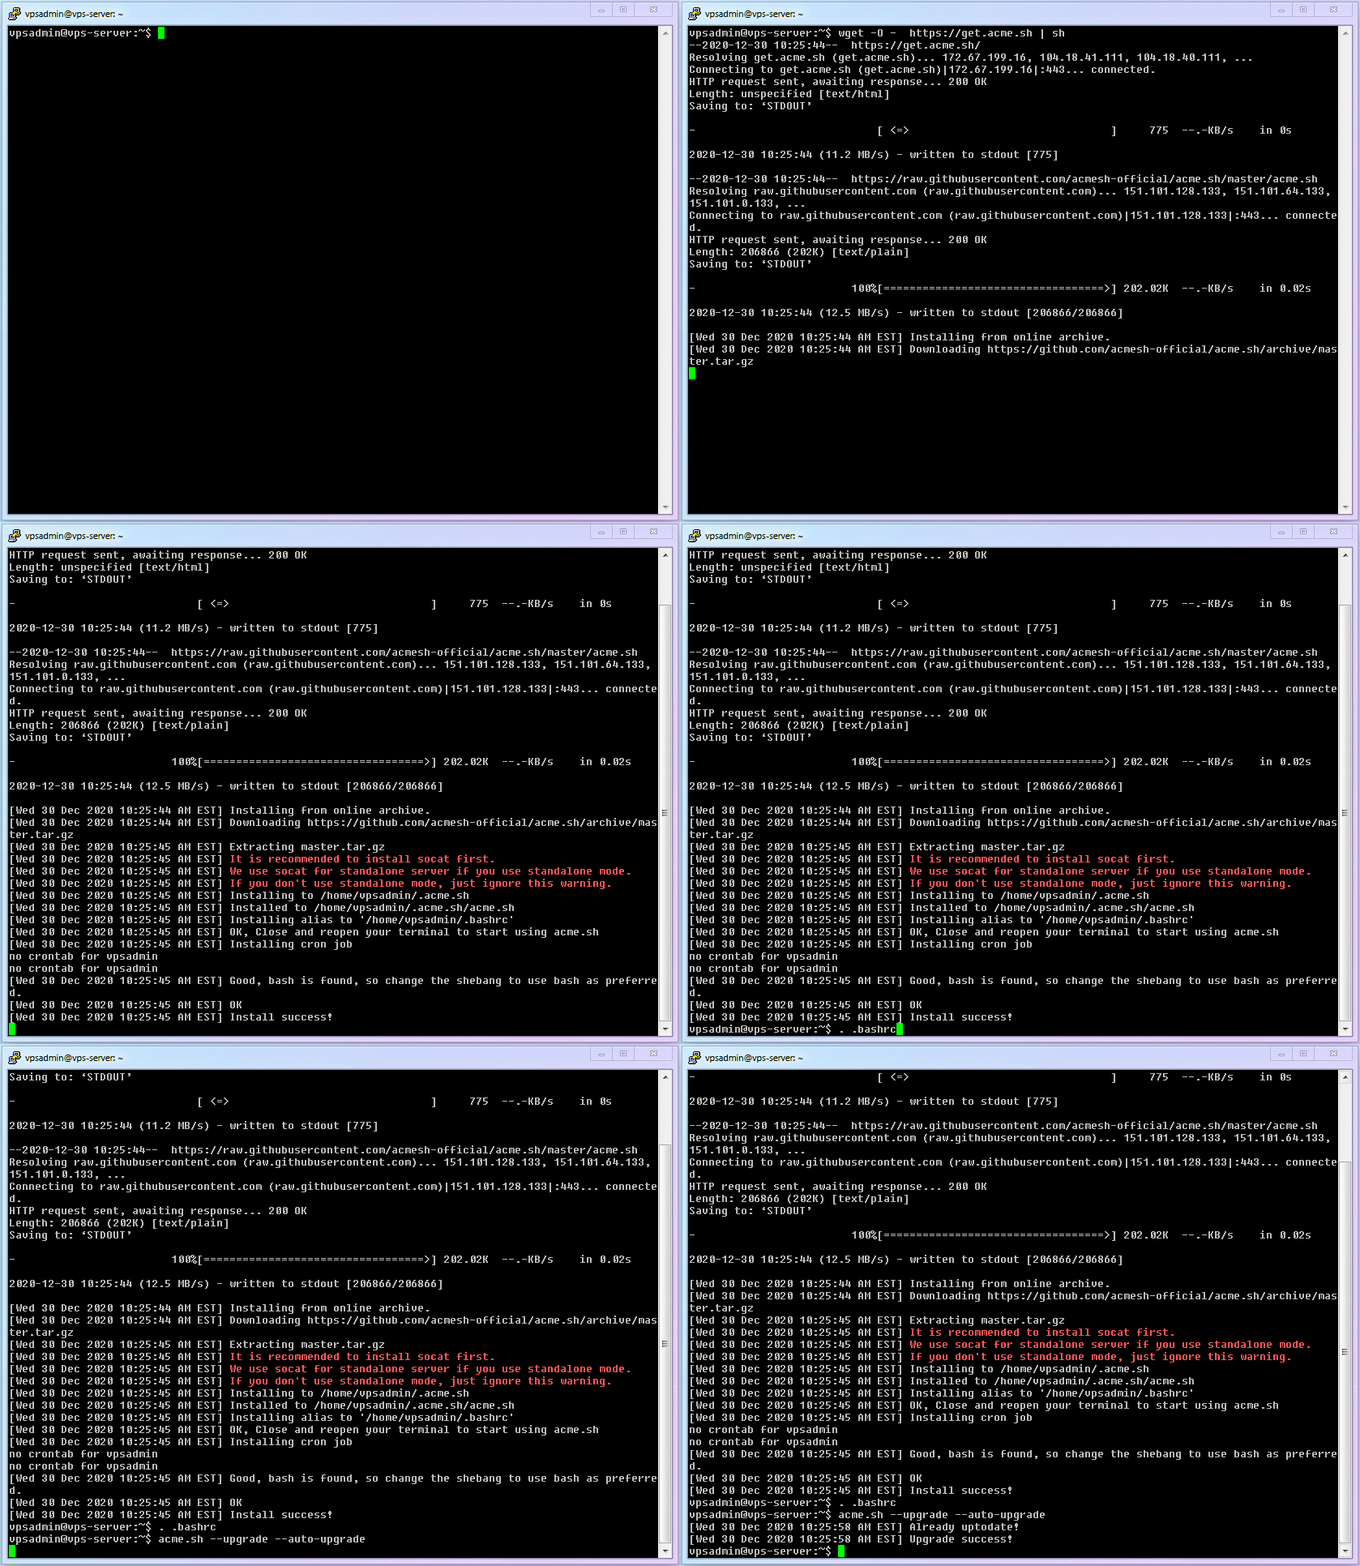
5.3 Test certificate issuance
Before applying for a real certificate, do a dry run with --issue --test. This helps you avoid repeated failures and Let’s Encrypt rate limits.
-
Test command:
acme.sh --issue --server letsencrypt --test -d www.example.com -w /home/admin/www/webpage --keylength ec-256This article uses ECC certificates because there is usually no strong reason not to. ECC keys are smaller, strong, and fast. If you need to support very old devices, then RSA may still be the more compatible choice.
-
If it succeeds, you should see output showing that the certificate was issued from the staging environment, for example with URLs under
https://acme-staging-v02.api.letsencrypt.org. -
If it fails, run the same command with
--debugadded at the end to get more detailed output:acme.sh --issue --server letsencrypt --test -d www.example.com -w /home/admin/www/webpage --keylength ec-256 --debug -
Once the test run succeeds, you are ready to request the real certificate. There is no need to delete the test certificate; it will be replaced automatically later.
5.4 Request the real certificate
-
Switch to the production CA and remove the
--testflag. Add--forcebecause the test certificate still exists and has not expired:acme.sh --set-default-ca --server letsencrypt acme.sh --issue -d www.example.com -w /home/admin/www/webpage --keylength ec-256 --force -
If it succeeds, you should again see confirmation output, but this time from the real Let’s Encrypt endpoint
https://acme-v02.api.letsencrypt.orgrather than the staging one.
5.5 Install the certificate
-
After issuance, install the certificate to the paths you want Nginx to use:
acme.sh --installcert -d www.example.com --cert-file /etc/cert/cert.crt --key-file /etc/cert/cert.key --fullchain-file /etc/cert/fullchain.crt --ecc -
Then edit the Nginx configuration:
sudo nano /etc/nginx/nginx.confAdd the following inside your
server {}block:listen 443 ssl http2; ssl_certificate /etc/cert/fullchain.crt; ssl_certificate_key /etc/cert/cert.key;/etc/cert/is only an example path. Adjust it to match where you actually installed the files. -
Reload Nginx:
sudo systemctl reload nginx -
If
https://www.example.comloads normally and your browser shows the padlock, the certificate installation succeeded.
5.6 Automatic renewal
-
Certificates expire after 90 days, so automatic renewal matters:
acme.sh --upgrade --auto-upgrade -
If you ever want to renew manually:
acme.sh --renew -d www.example.com --force -
To list certificates and check expiration dates:
acme.sh --list
5.7 Redirect HTTP to HTTPS automatically
-
Edit the Nginx configuration again:
sudo nano /etc/nginx/nginx.conf -
Inside
http {}, add a redirecting HTTP server and a TLS server block:server { listen 80; server_name www.example.com; return 301 https://$host$request_uri; } server { listen 443 ssl http2; ssl_certificate /etc/cert/fullchain.crt; ssl_certificate_key /etc/cert/cert.key; } -
Reload Nginx:
sudo systemctl reload nginx -
Now visiting
http://www.example.comshould redirect automatically tohttps://www.example.com.
6. Enable BBR
6.1 What BBR actually is
You have probably heard people talk about BBR as if it were magic. There are also names like bbrplus, bbr2, and all sorts of “modified BBR” scripts floating around.
So what is it really?
BBR stands for Bottleneck Bandwidth and Round-trip propagation time. It is a TCP congestion control algorithm. In plain language, it is traffic management for network packets. When the road is less congested, traffic moves more smoothly.
For most users, the difference between having BBR enabled and not having it enabled is noticeable, especially in speed, stability, and latency. So yes, I strongly recommend enabling BBR.
What matters less is obsessing over minor version differences. In real-world use, line quality matters far more than chasing some magical BBR variant.
6.2 Do not chase gimmicks
What about bbrplus, bbr2, “modified BBR,” or other flashy names?
Short answer: do not bother.
BBR improvements arrive together with newer Linux kernels. If you are on a reasonably modern kernel, you are already benefiting from newer work. Most of the flashy third-party scripts simply install preview kernels or unofficial modified kernels, which is rarely worth the stability tradeoff on a real server.
Likewise for congestion algorithms such as fq, fq_codel, fq_pie, or cake: if you do not fully understand the tradeoffs, sticking with fq is a safe choice.
And as for ancient “acceleration tools” like 锐速, Finalspeed, or LotServer: leave them in the past. Many of them improve packet delivery only by sending redundant traffic, which may help on terrible lines but wastes bandwidth and can hurt everyone else.
6.3 Install a newer kernel and enable BBR
-
Add Debian 10
backportsso you can install a newer official kernel:sudo nano /etc/apt/sources.listAdd this line at the end:
deb http://archive.debian.org/debian buster-backports main -
Refresh packages and install the newer kernel. This article uses
amd64as the example:sudo apt update && sudo apt -t buster-backports install linux-image-amd64If your server supports it, you can also try the cloud-specific kernel
linux-image-cloud-amd64. It is leaner, but on unsupported systems it may fail to boot. If you want to experiment, do it only after taking a snapshot or confirming that you have a working rescue/VNC path. -
Edit the sysctl configuration:
sudo nano /etc/sysctl.confAdd:
net.core.default_qdisc=fq net.ipv4.tcp_congestion_control=bbr -
Reboot the server so both the new kernel and the BBR settings take effect:
sudo reboot -
Full demo:
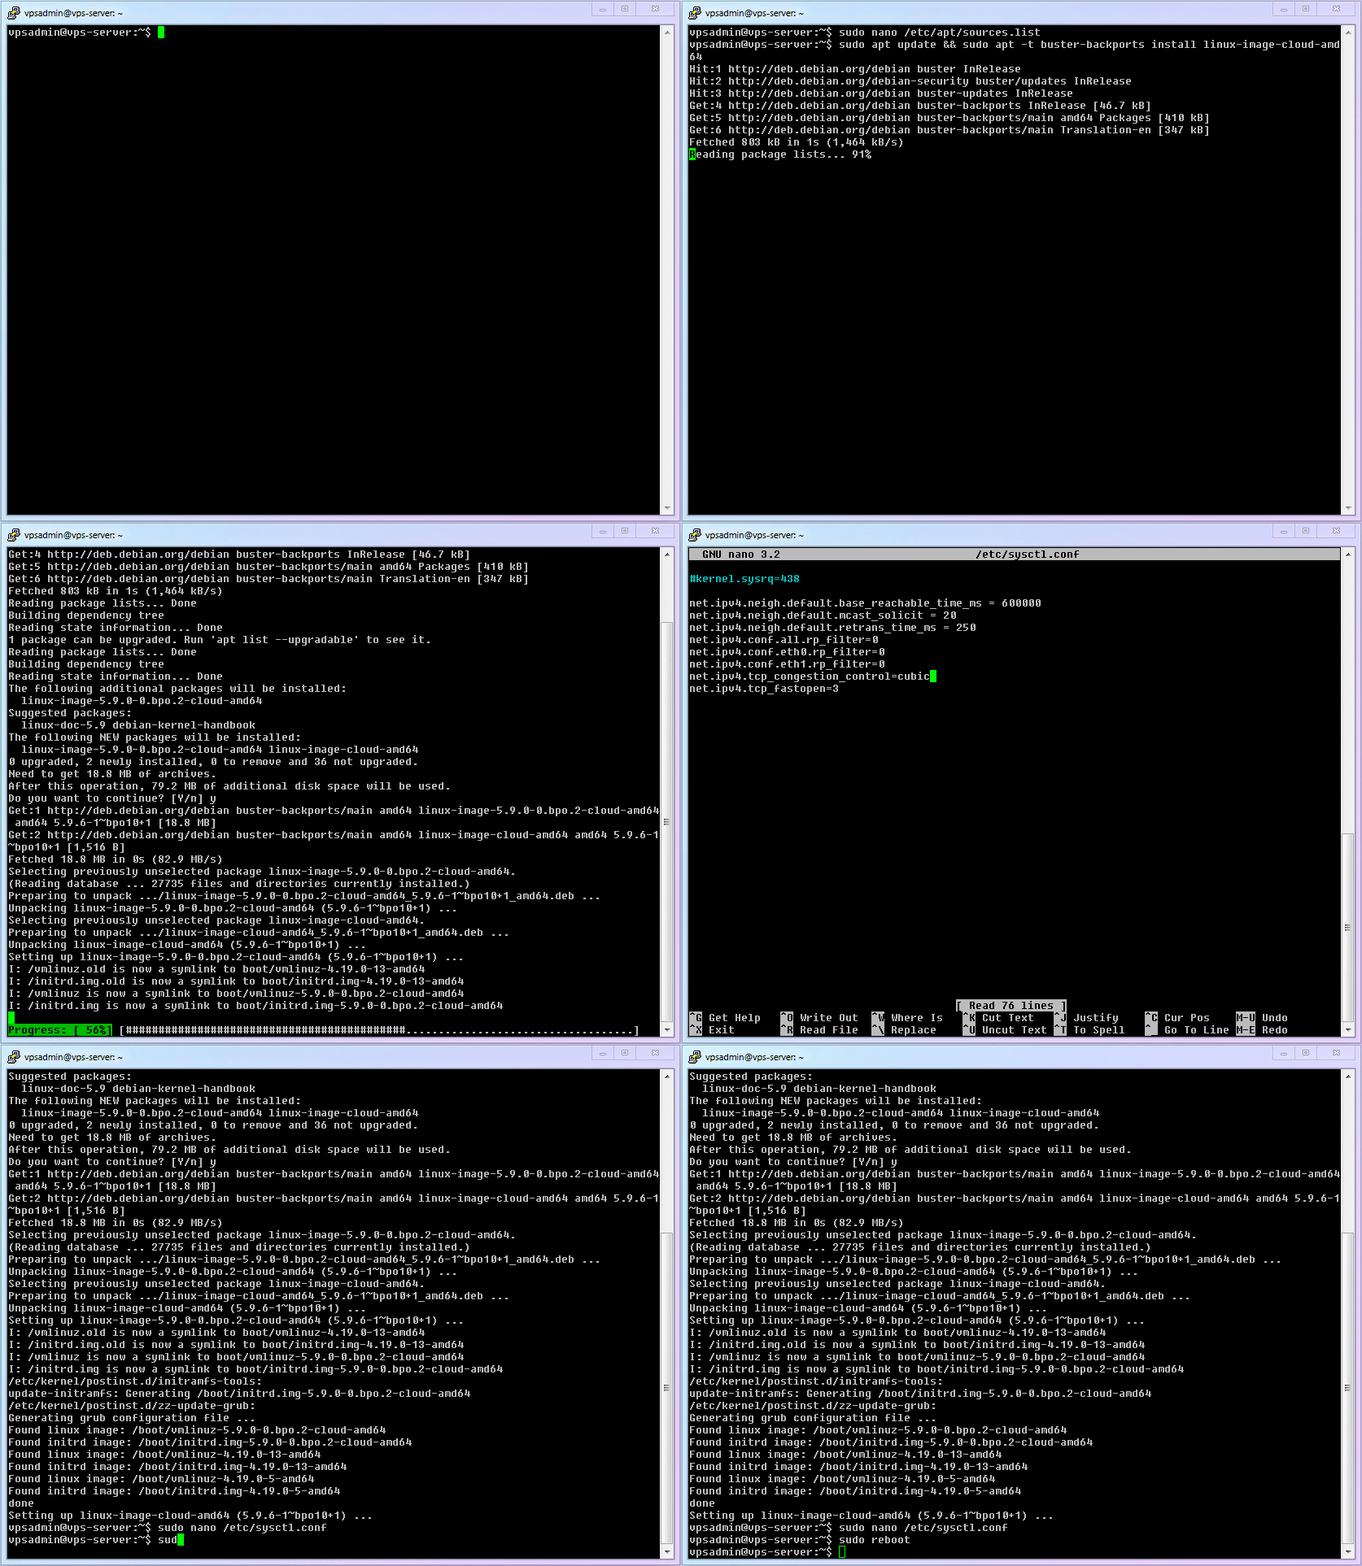
-
To verify that BBR is active:
lsmod | grep bbrYou should see:
tcp_bbr -
To verify that
fqis active:lsmod | grep fqYou should see:
sch_fq
7. Source
This article is based on related Markdown files from the GitHub repository XTLS/Xray-docs-next, with practical adjustments and additions.